10 Lesser-Known Dart and Flutter Functionalities You Should Start Using
I started writing Dart code in 2019, and since then, I've been learning something new every day. It’s fascinating to see what this framework and language have to offer.
In this article, I want to share some of those hidden gems I’ve discovered—lesser-known functionalities that can simplify your development process and add a unique touch to your apps. Moreover, we will go deeper into the implementation and explore how they are implemented to learn more about the patterns.
Let’s uncover some of these functions and methods together!
Future.any
When building Dart or Flutter apps, concurrency is an important tool for managing multiple tasks. One of Dart’s concurrency features is Future.any, a function that returns a Future completing as soon as one of a given set of futures finishes—success or error.
In practical terms, if you throw a handful of asynchronous tasks at Future.any, it will wait until the fastest (or the first to fail) comes back and then resolve with that result or error.
First, let's see how to use it.
void main() async {
  final result = await Future.any([
    slowInt(),        // Completes in 2s, returning 2
    delayedString(),  // Completes in 2s, throws TimeoutException
    fastInt()         // Completes in 1s, returning 3
  ]);

  // Because fastInt finishes first, the entire race completes with 3.
  print(result); // 3
}

Future<int> slowInt() async {
  await Future.delayed(const Duration(seconds: 2));
  return 2;
}

Future<String> delayedString() async {
  await Future.delayed(const Duration(seconds: 2));
  throw TimeoutException('Time has passed');
}

Future<int> fastInt() async {
  await Future.delayed(const Duration(seconds: 1));
  return 3;
}
In the example above, fastInt completes first (with 3), so Future.any resolves with 3. The subsequent completion of slowInt() and the TimeoutException from delayedString() have no effect on the result because the race is already decided.


To understand how this works, let's look under the hood of Future.any and see its implementation. Here’s a simplified version of the function’s source:
static Future<T> any<T>(Iterable<Future<T>> futures) {
  var completer = Completer<T>.sync();

  void onValue(T value) {
    if (!completer.isCompleted) {
      completer.complete(value);
    }
  }

  void onError(Object error, StackTrace stack) {
    if (!completer.isCompleted) {
      completer.completeError(error, stack);
    }
  }

  for (var future in futures) {
    future.then(onValue, onError: onError);
  }

  return completer.future;
}
Let's actually analyze this implementation:
Future.any iterates over each Future in futures and attaches two callbacks:
- onValue: Completes the
Completerwith the first successful result. - onError: Completes the
Completerwith the first error thrown.
Whichever future finishes first triggers its respective callback, and the Completer gets completed.
Then, a Completer<T> lets us create and complete a Future<T> manually. The .sync() constructor can complete immediately if a future is already finished at the time of subscription, which can be a slight optimization in some concurrency scenarios.
Once the completer’s complete or completeError method is called, the Completer is considered done. Any subsequent attempts to complete it (whether from another future finishing or from additional calls) are ignored.
And finally, “Winner-Takes-All” — But No Cancellation. What does it mean?
One important detail is that any future that does not finish first isn’t actually canceled or stopped; it continues running in the background. While the result is ignored by Future.any, from a resource usage standpoint those tasks can still use CPU cycles, memory, or network bandwidth. In many cases, this is acceptable, but if you’re dealing with expensive computations or large network downloads, you might want to design a cancellation mechanism to prevent wasted work.
last but not least, an error thrown by the first future to finish short-circuits the race and completes the returned Future with that error. This is often referred to as a “fail fast” mechanism. If you’d prefer to ignore errors until at least one successful value is returned, you’ll need to handle that logic manually (for example, by catching and suppressing errors in each future).
Now there are a few lessons that we can learn from this implementation and function and use them in our next Flutter or Dart applications:
-
Race Conditions for Performance. One of the most common uses of
Future.anyis to boost responsiveness. For example, if you have multiple data sources (like a primary and fallback server), you can let them both fetch data and return whichever arrives first. This can reduce perceived latency and improve user experience. -
Timeouts Without
Future.timeout. Another neat trick is pairingFuture.anywithFuture.delayed:final firstFinished = await Future.any([
slowOperation(),
Future.delayed(Duration(seconds: 3), () => 'Timeout!')
]);If
slowOperationtakes more than three seconds, the delayed future completes first and returns'Timeout!'. This is a nice alternative toFuture.timeoutwhen you want different handling or more complex logic than a standard timeout.A great example in Flutter would be falling back to cache when API is delayed:
Future<String> fetchDataFromServer() async {
  await Future.delayed(Duration(seconds: 5)); // Simulate slow network
  return "Server Response";

}

Future<String> getCachedData() async {
  return "Cached Data";
}

void main() async {
  final result = await Future.any([
    fetchDataFromServer(),
    Future.delayed(Duration(seconds: 3), getCachedData), // Timeout fallback
  ]);

  print(result); // Prints "Cached Data" if server is too slow, else "Server Response"
}
This approach ensures you can add more fallback options if needed and allows for custom fallback behavior rather than just an exception.
-
Consider Resource Consumption. Since
Future.anydoesn’t cancel the losing futures, be wary of creating heavy computations or large file downloads that will continue in the background even after another future “wins.” If resource management is crucial, structure your code to either:- Cooperatively check a shared “canceled” flag in those futures.
- Use isolates that you can kill if you don’t need their results anymore.
import 'dart:async';
import 'dart:io';

bool _isCancelled = false; // Shared flag

Future<String> fetchDataFromAPI() async {
  await Future.delayed(Duration(seconds: 3)); // Simulate network delay
  if (_isCancelled) throw "API task canceled!";
  return "API Response";
}

Future<String> parseLargeFile() async {
  // Simulating a heavy operation
  for (int i = 0; i < 1000000000; i++) {
    if (_isCancelled) throw "File parsing canceled!"; // Stop work
  }
  return "Parsed File Data";
}

void main() async {
  try {
    final result = await Future.any([
      fetchDataFromAPI(),
      parseLargeFile(),
    ]);

    _isCancelled = true; // Cancel the other operation
    print(result); // Prints the first result that completes
  } catch (e) {
    print("Error: $e");
  }
}
Here in this example, the
_isCancelledflag allows the slow operation to self-terminate if it's no longer needed and prevents wasting CPU cycles on a long-running file parse after the API already responded.Let's look at another example:
import 'dart:async';
import 'dart:isolate';

Future<String> computeHeavyTask(SendPort sendPort) async {
  int sum = 0;
  for (int i = 0; i < 1000000000; i++) {
    sum += i;
  }
  sendPort.send("Computation Done");
  return "Computation Done";
}

Future<String> fetchDataFromAPI() async {
  await Future.delayed(Duration(seconds: 3)); // Simulate network delay
  return "API Response";
}

void main() async {
  final receivePort = ReceivePort();
  final isolate = await Isolate.spawn(computeHeavyTask, receivePort.sendPort);

  try {
    final result = await Future.any([
      fetchDataFromAPI(),
      receivePort.first.then((message) => message as String),
    ]);

    isolate.kill(); // Stop the isolate if it's still running
    print(result);
  } catch (e) {
    print("Error: $e");
  }
}
In this example, The heavy computation runs in an isolate (a separate thread)/ If the API wins, we kill the isolate, preventing wasted CPU usage and make it efficient for background tasks that might run indefinitely unless stopped.
-
“Fail Fast” vs. “Wait for Success”. Because the first error also resolves (with an error), you might inadvertently “fail” before a potentially successful future finishes. This is usually desired in a race scenario, but it’s something to keep in mind. If you only want the first success (and to ignore errors entirely), you’d need a custom approach (e.g., handle errors inside each future and only pass them along if all attempts fail).
Here is an example of this scenario:
Future<String?> fetchFromServerA() async {
  try {
    await Future.delayed(Duration(seconds: 2));
    throw Exception("Server A Failed!");
  } catch (_) {
    return null; // Return null instead of throwing
  }
}

Future<String?> fetchFromServerB() async {
  await Future.delayed(Duration(seconds: 3));
  return "Data from Server B"; // A valid response
}

void main() async {
  final result = await Future.any([
    fetchFromServerA(),
    fetchFromServerB(),
  ].map((future) => future.catchError((_) => null))); // Handle errors inline

  if (result != null) {
    print("First successful result: $result"); // Prints "Data from Server B"
  } else {
    print("All servers failed.");
  }
}
In this example, we ignore failures and waits for success instead of failing early and it prevents race conditions where an early failure causes
Future.anyto reject everything however, still ensures responsiveness, since the first successful response is returned immediately.
DCM offers avoid-unnecessary-collections rule where it warns when a collection literal can be replaced by its first and only element.
❌ Bad:
Future<void> fn() async {
  await Future.wait([future]); // LINT: Avoid unnecessary collections. Try awaiting this 'Future' directly.
  await Future.any([future]); // LINT: Avoid unnecessary collections. Try awaiting this 'Future' directly.

  _array.addAll([value]); // LINT: Avoid unnecessary collections. Try using '.add' instead.
  _array.addAll({value}); // LINT: Avoid unnecessary collections. Try using '.add' instead.

  Stream.fromFutures([future]); // LINT: Avoid unnecessary collections. Try using '.fromFuture' instead.
  Stream.fromIterable([value]); // LINT: Avoid unnecessary collections. Try using '.value' instead.

  set.addAll([value]); // LINT: Avoid unnecessary collections. Try using '.add' instead.
  set.containsAll([value]); // LINT: Avoid unnecessary collections. Try using '.contains' instead.
}
✅ Good:
Future<void> fn() async {
  await future;

  _array.add(value); // Correct, 'add' instead of 'addAll'

  Stream.fromFuture(future);
  Stream.value(value);

  set.add(value);
  set.contains(value);
}
To learn more, be sure to check out the official Dart documentation on Future.any.
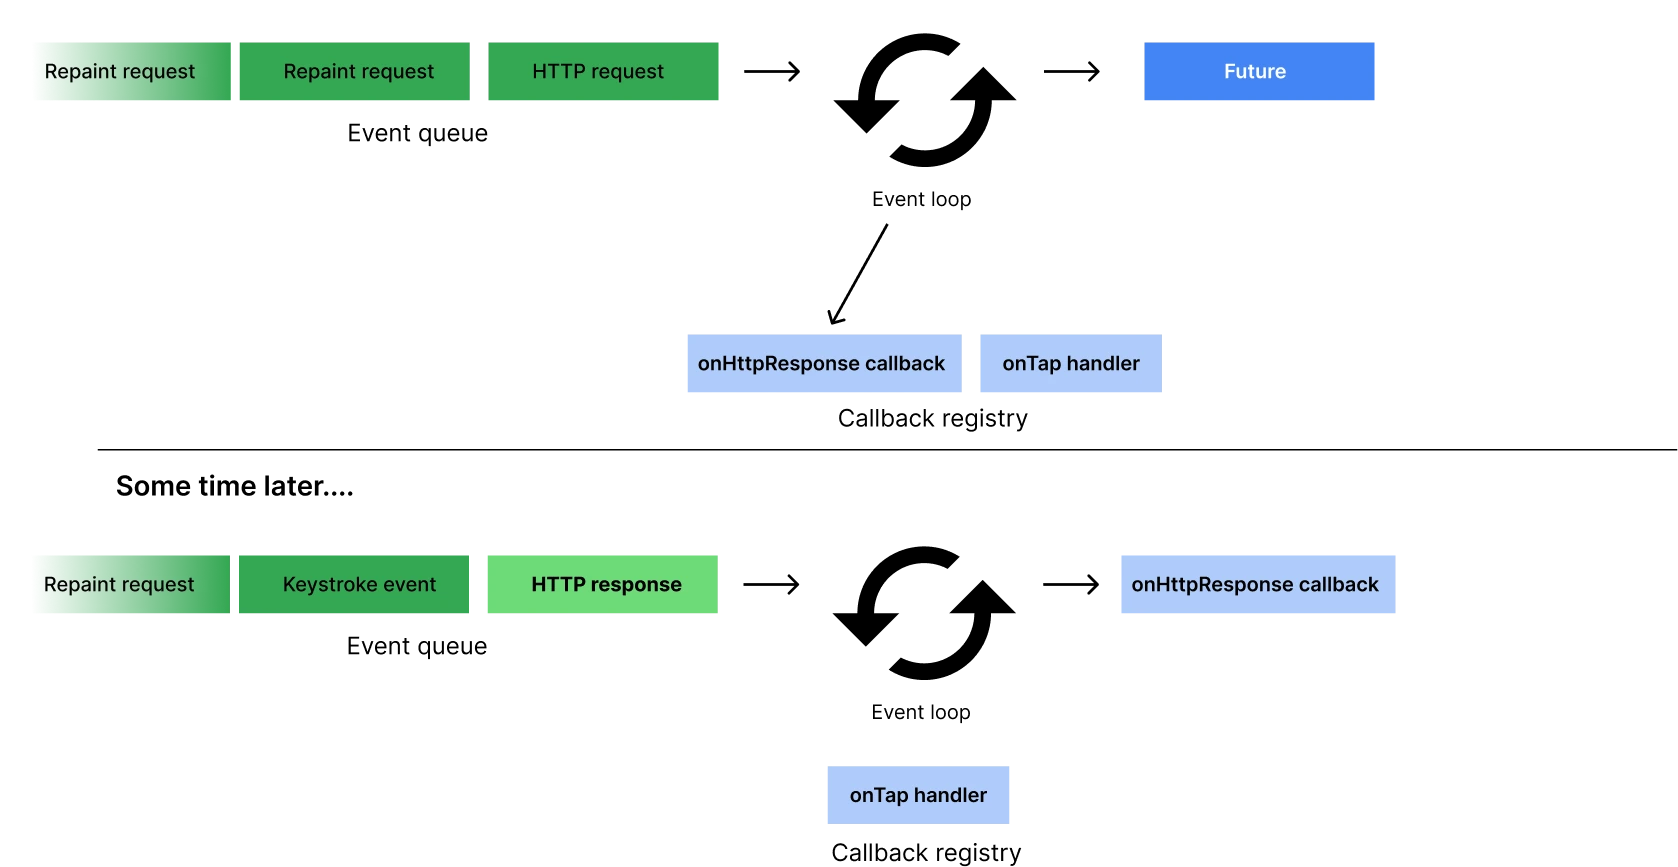
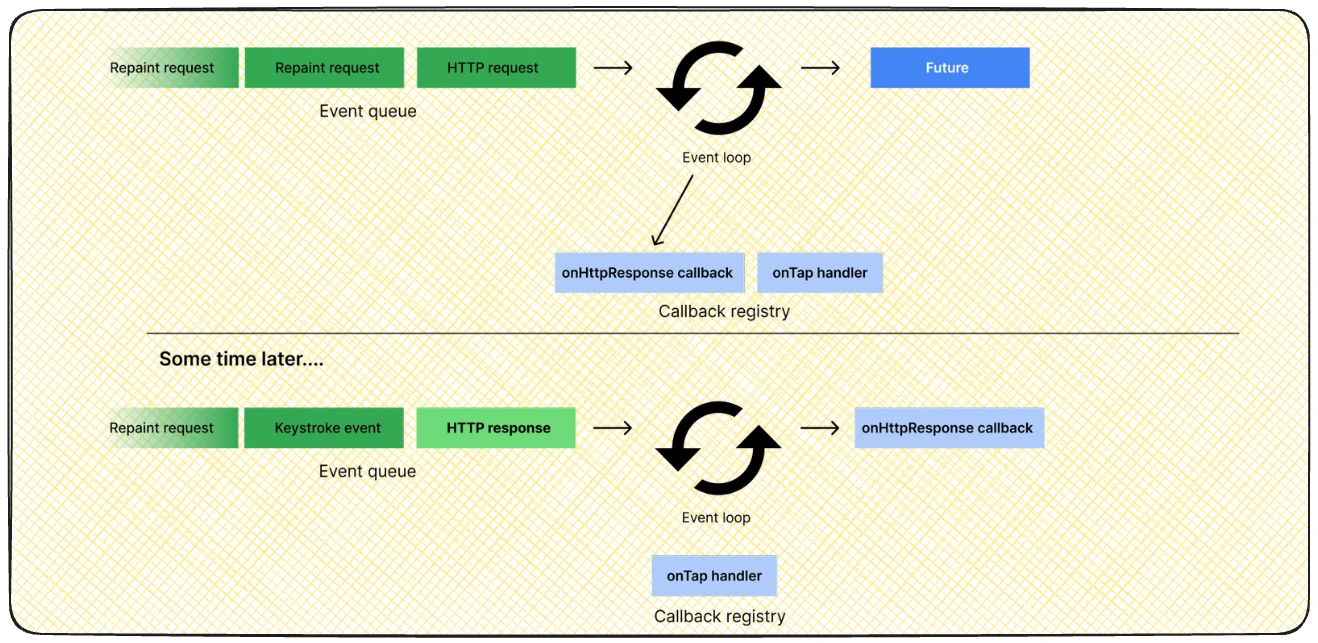
scheduleMicrotask
Dart’s concurrency model offers scheduleMicrotask, a lower-level mechanism that places a callback in the microtask queue. This ensures the callback runs before the next “regular” event on the event loop.
I encourage to learn more about Event Loop in Dart. I might even write a blog post about it later. It's such an important topic.
While it’s incredibly powerful for immediate, asynchronous tasks, it comes with caveats you’ll want to understand.
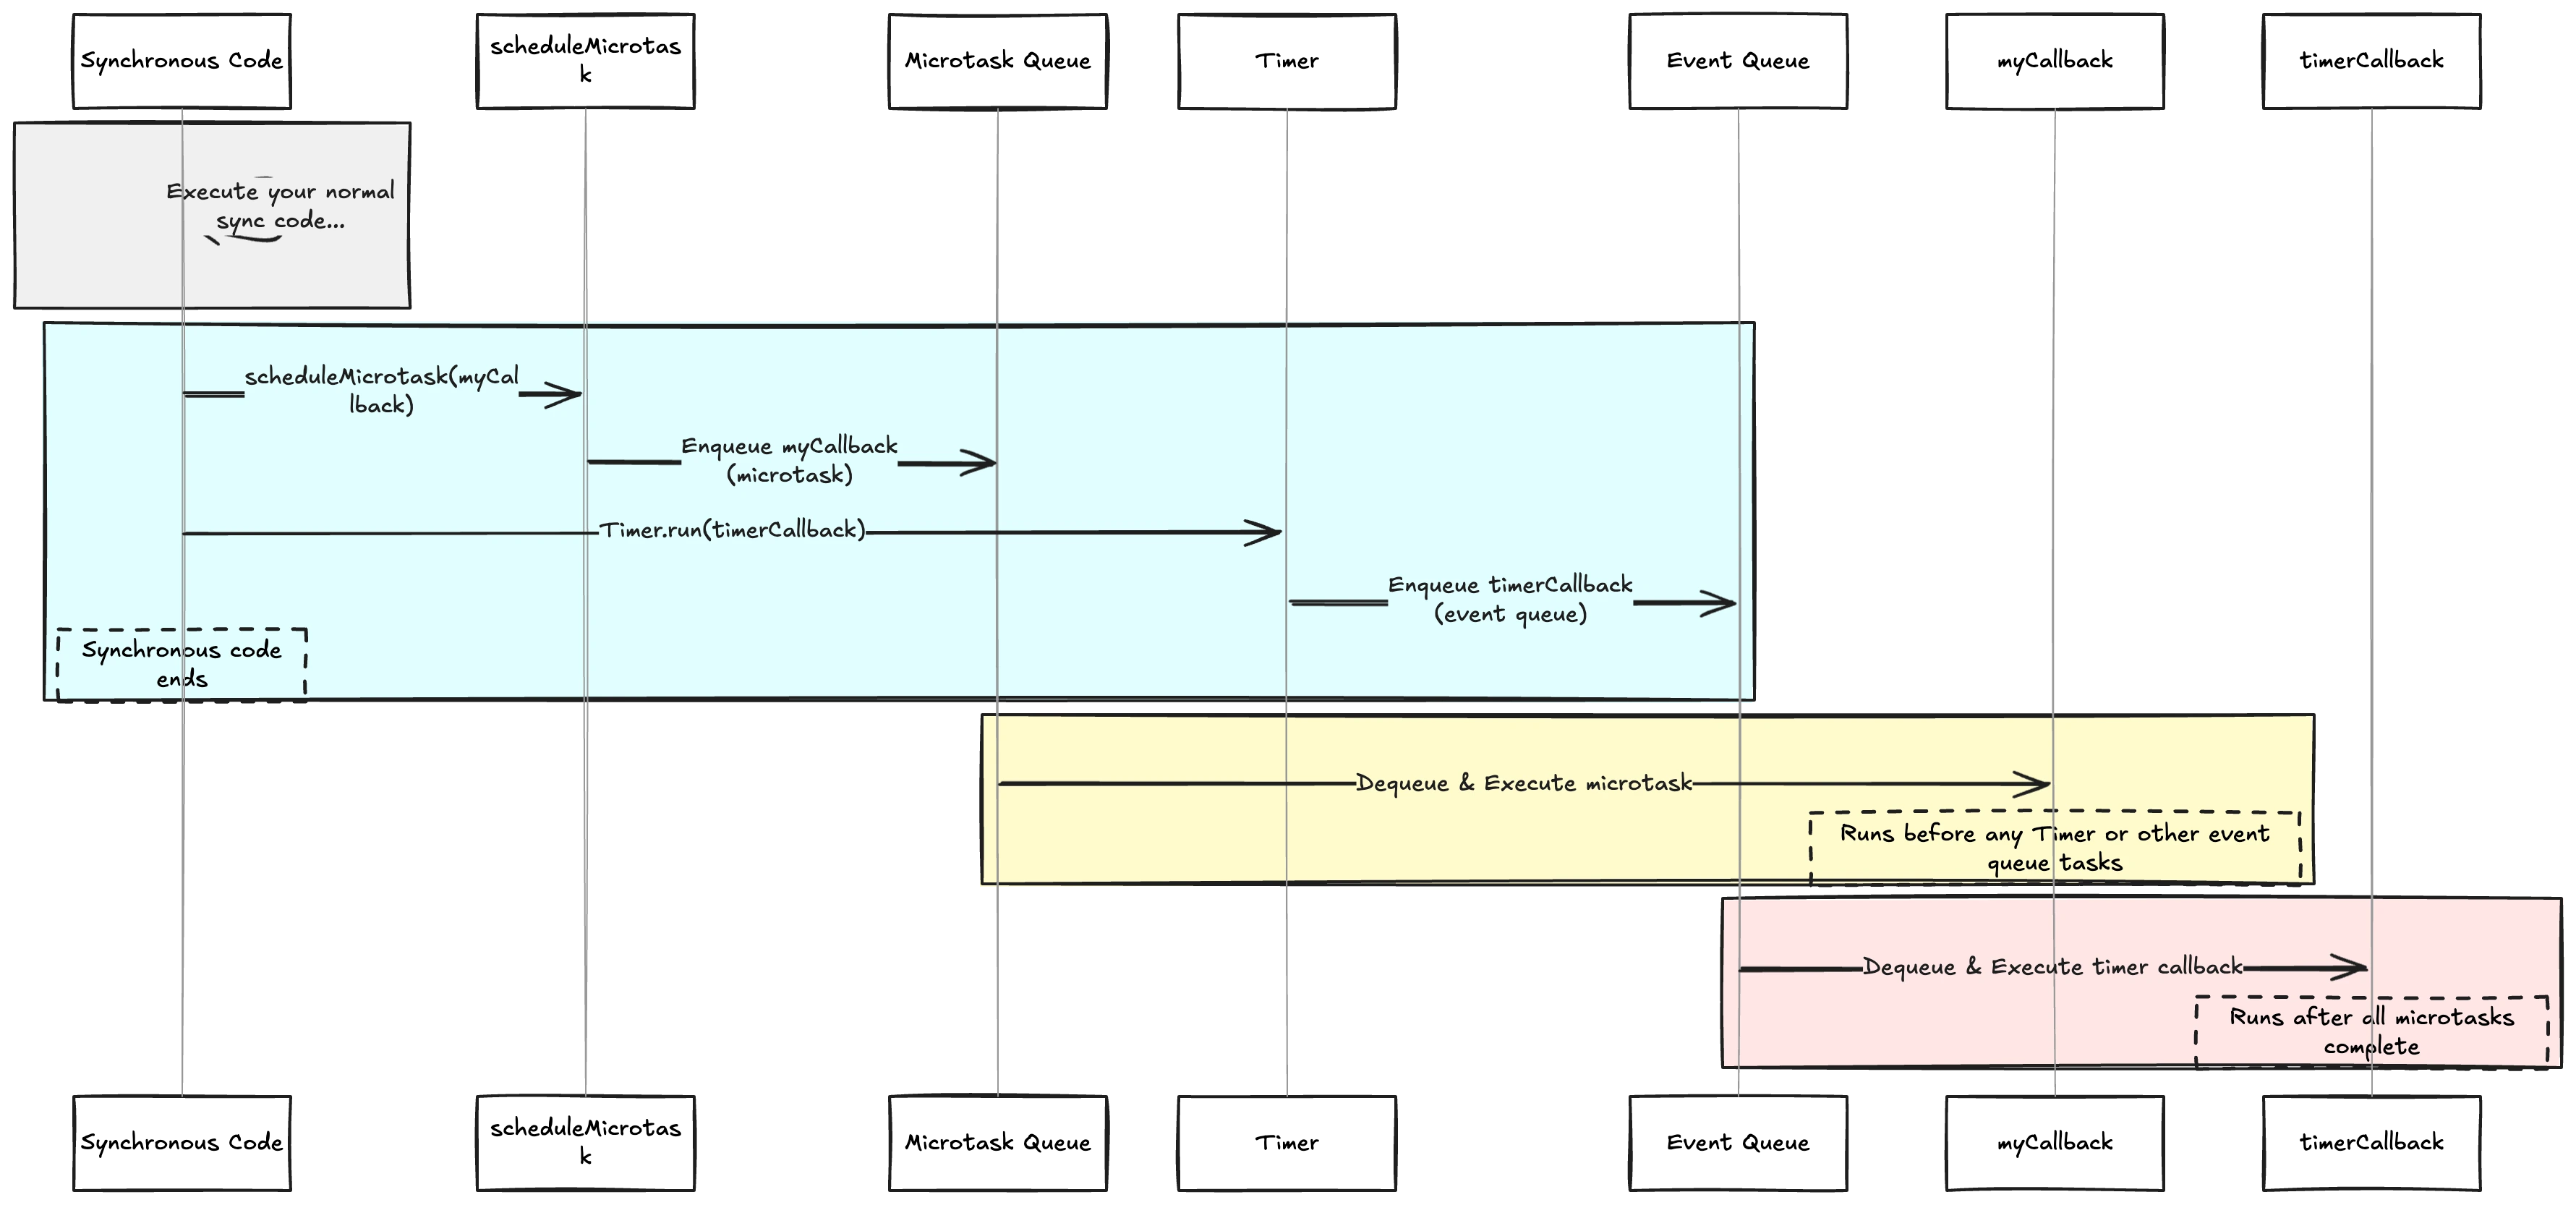
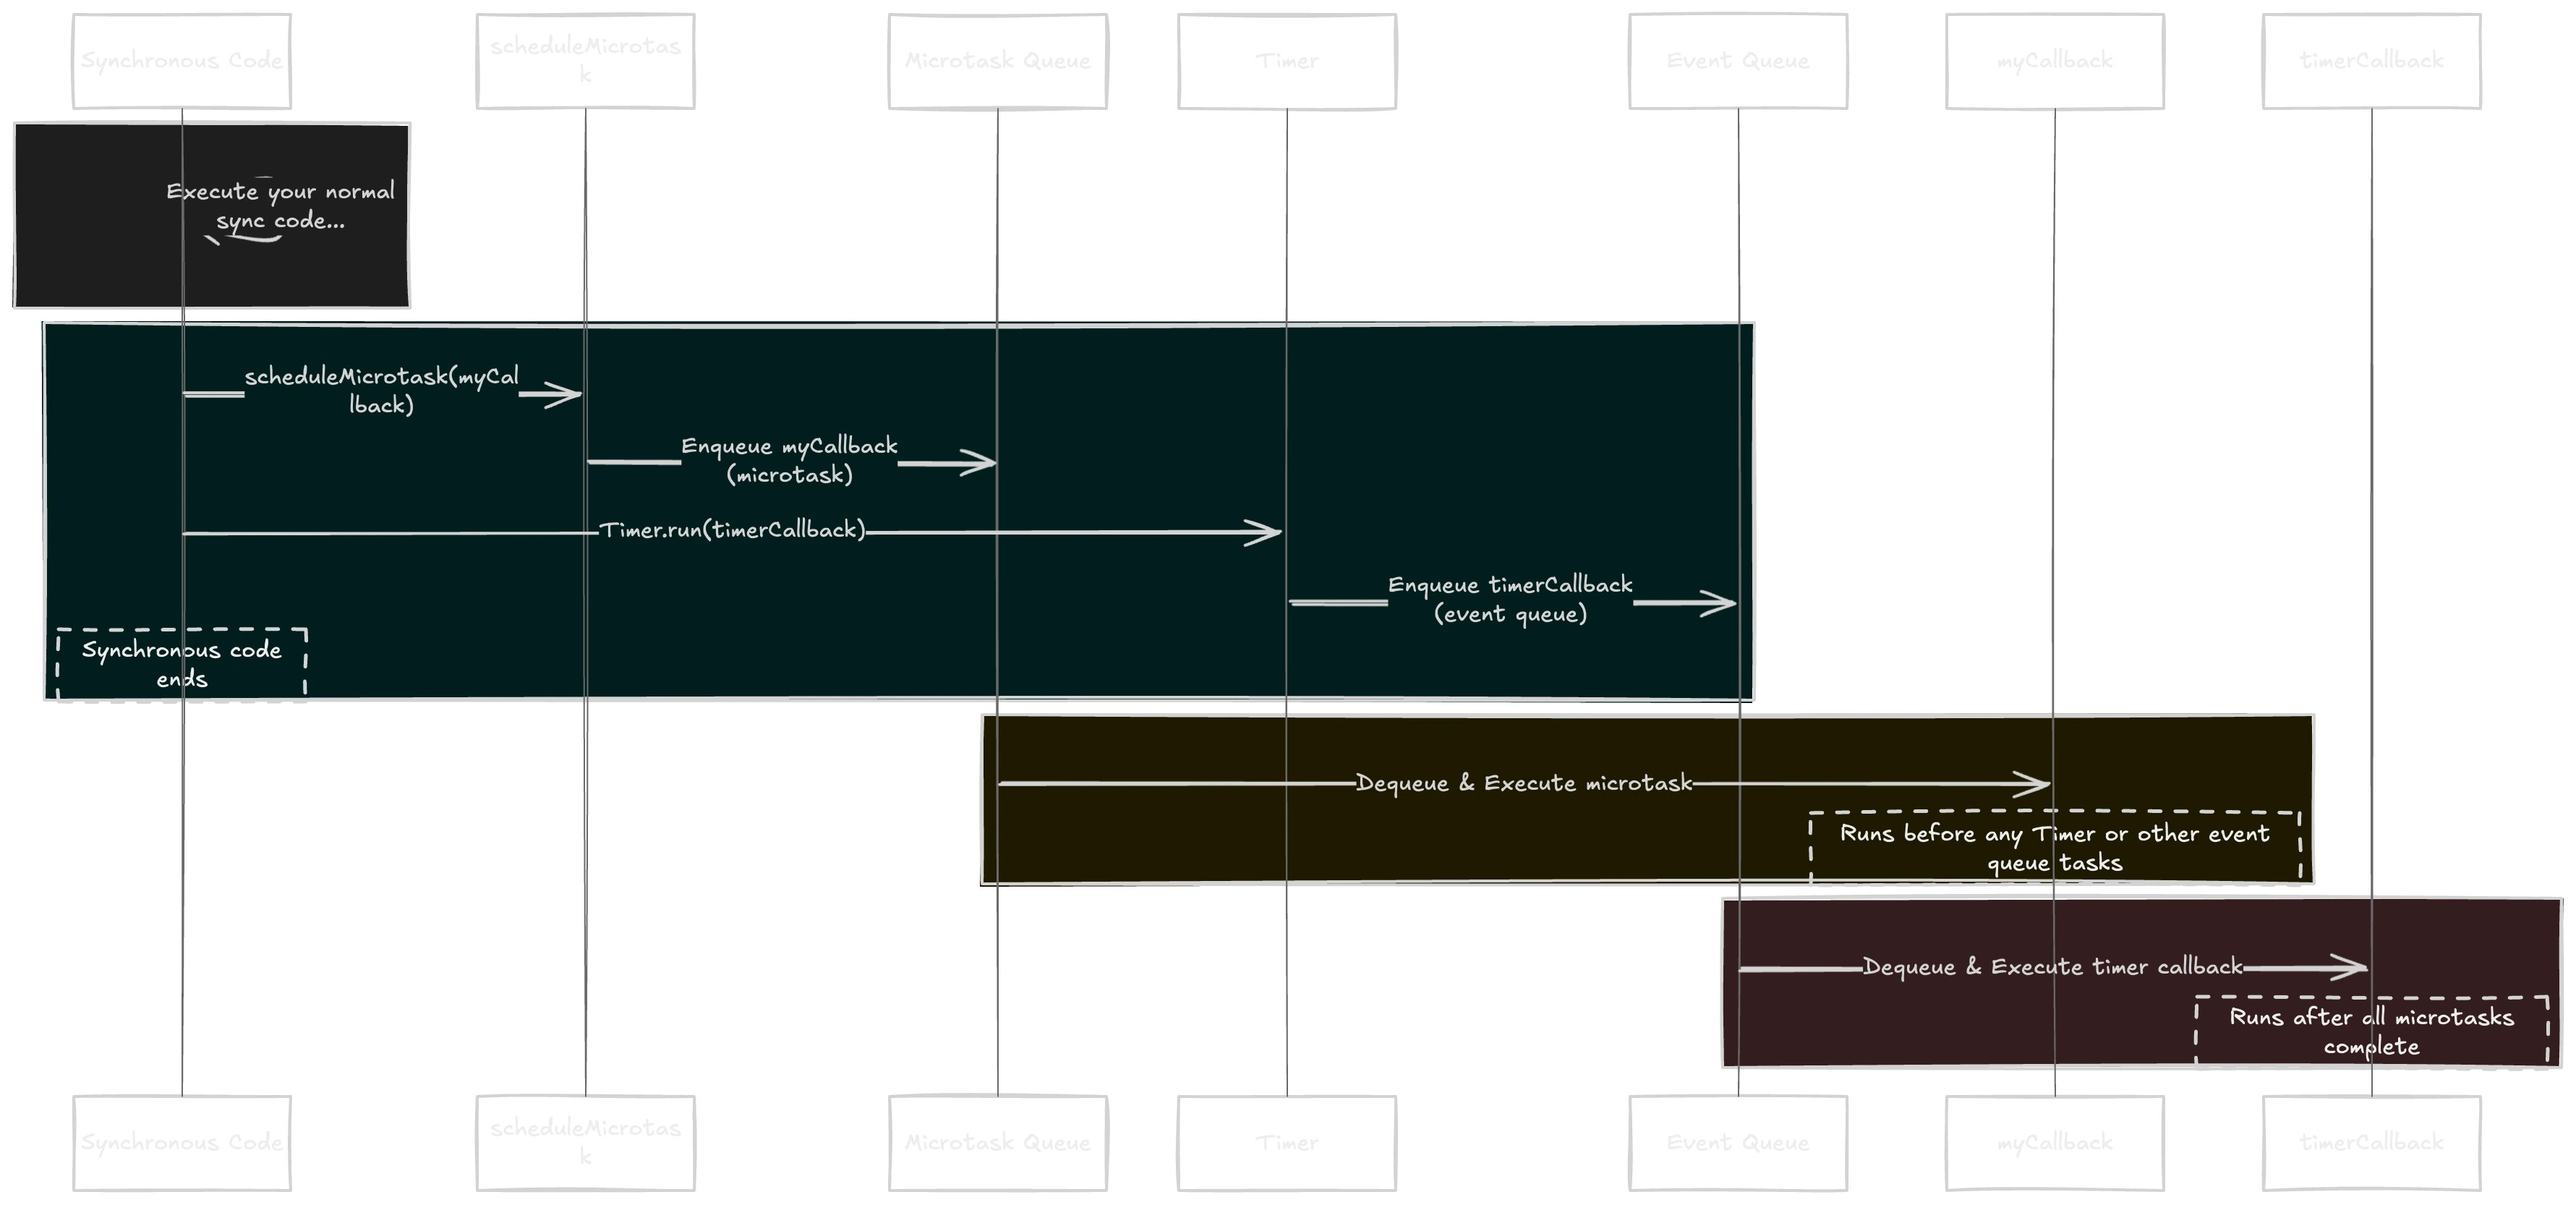
scheduleMicrotask lets you register a callback to run as soon as the current synchronous execution completes—and crucially, before any scheduled Timer.run events or other tasks in the regular event queue. For example:
import 'dart:async';

void main() {
  Timer.run(() => print('Timer event'));          // Regular event
  scheduleMicrotask(() => print('Microtask event')); // Microtask event
  print('Main done');
}

// Output:
// Main done
// Microtask event
// Timer event
Here is what is happening if I break it down:
- “Main done” is printed immediately.
- The microtask is executed next.
- Finally, the timer event fires.
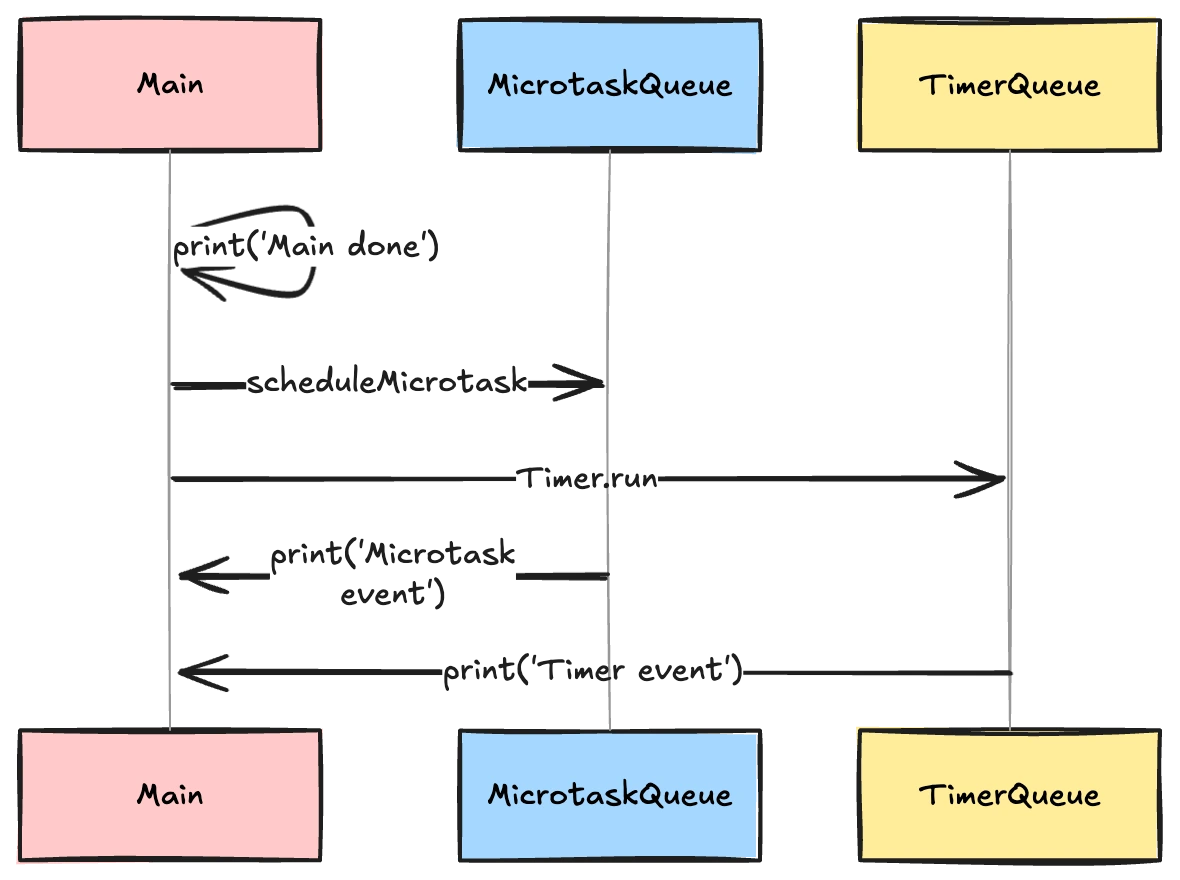

To look at how this with event loop and having a more comprehensive look the diagram below helps:
You may wonder when to use this. Here are a few situations:
- Immediate Deferred Work: If you need to schedule code to run asynchronously but still before other pending events, a microtask is often the right choice.
- Breaking Up Large Tasks: In some scenarios, you might use microtasks to split up CPU-intensive work so that each chunk runs just after the previous chunk completes but before external events.
Warning: It’s possible to starve the regular event loop by continuously scheduling more microtasks. This can prevent timers or I/O events from firing in a timely manner.
Let's now see how scheduleMicrotask works under the hood. Below is a simplified version of the SDK implementation:
('vm:entry-point', 'call')
void scheduleMicrotask(void Function() callback) {
_Zone currentZone = Zone._current;
if (identical(_rootZone, currentZone)) {
// Calls a specialized root-zone method to schedule the microtask.
_rootScheduleMicrotask(null, null, _rootZone, callback);
return;
}
_ZoneFunction implementation = currentZone._scheduleMicrotask;
if (identical(_rootZone, implementation.zone) &&
_rootZone.inSameErrorZone(currentZone)) {
_rootScheduleMicrotask(
null,
null,
currentZone,
currentZone.registerCallback(callback),
);
return;
}
Zone.current.scheduleMicrotask(Zone.current.bindCallbackGuarded(callback));
}
Let's analyze this implementation:
-
Zone Awareness. Dart has a concept called a Zone, which can intercept or modify asynchronous calls. When you invoke
scheduleMicrotask, Dart checks if you’re in the root zone or a custom zone.- If you’re in the root zone, it directly calls
_rootScheduleMicrotaskfor maximum efficiency. - Otherwise, it defers to the current zone’s
_scheduleMicrotaskmethod, which can do additional work like error handling or logging.
- If you’re in the root zone, it directly calls
-
Binding Callbacks. If there is a custom zone, Dart “binds” your callback to that zone to ensure that unhandled errors get routed to the zone’s error handlers. If you’re in the root zone, it doesn’t need to add any extra logic.
-
Microtask Queue. Once scheduled, your callback is placed in the microtask queue, which runs before the normal event loop tasks (like timers or I/O callbacks). This is why
scheduleMicrotaskcan be used for “high-priority” async tasks. -
Potential Starvation. Because microtasks have priority over regular events, repeatedly scheduling new microtasks in a microtask callback can effectively create an infinite loop that blocks all timers and I/O from proceeding. This is a known pitfall in event-driven architectures.
By looking at this implementation, there are a few lessons that we can learn and use in our next Flutter and Dart project.
-
Break Up Computationally Heavy Work. In principle,
scheduleMicrotaskcan be used to subdivide intensive logic into smaller chunks. For instance, you can do part of a calculation, then schedule a microtask for the next part. However, for very large jobs, considerIsolates or other concurrency patterns—microtasks alone won’t yield to the system if you keep scheduling more microtasks within each callback. -
Zone Considerations. If you’re implementing or relying on custom zones (for logging, error catching, or instrumentation), you’ll see that
scheduleMicrotaskrespects those. It automatically callszone.bindCallbackGuarded(...), which ensures errors remain in the zone’s scope. -
Real-World Flutter Use Cases. In a typical Flutter app, you rarely need to manually call
scheduleMicrotaskfor day-to-day tasks. However, advanced scenarios—like implementing custom asynchronous operations, hooking into the event loop for performance measurements, or carefully orchestrating tasks—may involve microtasks.- For instance, you might place a small state update in the microtask queue if you want it to happen after current synchronous code but before the next frame or next timer.
import 'dart:async';
import 'package:flutter/material.dart';
class DataService {
// Dummy method to demonstrate logic
void fetchSomething() {
debugPrint('DataService is fetching something...');
}
}
class MyInheritedWidget extends InheritedWidget {
final DataService dataService;
const MyInheritedWidget({
Key? key,
required this.dataService,
required Widget child,
}) : super(key: key, child: child);
static MyInheritedWidget? of(BuildContext context) {
return context.dependOnInheritedWidgetOfExactType<MyInheritedWidget>();
}
bool updateShouldNotify(MyInheritedWidget oldWidget) {
return oldWidget.dataService != dataService;
}
}
class MyHomePage extends StatefulWidget {
_MyHomePageState createState() =>_MyHomePageState();
}
class _MyHomePageState extends State<MyHomePage> {
void initState() {
super.initState();
// Schedule a microtask to run after initState is finished,
// but before other events like Timer.run or user interactions.
scheduleMicrotask(() {
final inherited = MyInheritedWidget.of(context);
inherited?.dataService.fetchSomething();
});
}
Widget build(BuildContext context) {
return Scaffold(
appBar: AppBar(
title: Text('scheduleMicrotask Example'),
),
body: Center(child: Text('Check debug console for fetch message.')),
);
}
}
void main() {
runApp(
MyInheritedWidget(
dataService: DataService(),
child: MaterialApp(home: MyHomePage()),
),
);
} -
Debugging Async Code. Understanding the difference between microtask queue and event queue is key to debugging complex async issues. If you suspect your timers or UI events aren’t firing, check whether your code is stuck scheduling microtasks in a tight loop.
-
Don’t Abuse Microtasks. While they provide a shortcut for immediate async execution, sprinkling too many calls to
scheduleMicrotaskmight cause you to starve out other events (like UI repaint or network responses). If you need time for the event loop to handle external events, you might be better off using a normalTimer.run(...)orFuture(...).
DCM offers several rules to facilitate using Pragmas.
First, avoid-unknown-pragma rule where it warns when the @pragma annotation has an unknown value.
❌ Bad:
// LINT: Avoid unknown pragma annotations. Try checking this annotation for a potential typo.
('vm:prefer-inlined')
Future<String> fn() {
...
}
✅ Good:
('vm:prefer-inline') // Correct, 'inline' instead of 'inlined'
Future<String> fn() {
...
}
Second rule is avoid-redundant-pragma-inline where it warns when a @pragma('vm:prefer-inline') annotation has no effect.
The Dart compiler can't inline certain methods, even if they are annotated with @pragma('vm:prefer-inline'). Those include methods with a try block, methods declared async, async*, sync* and certain core library methods. ❌ Bad:
class SomeClass {
// LINT: This 'vm:pragma-inline' annotation has no effect. Try removing it.
('vm:prefer-inline')
Future<void> asyncMethod() async {
await good();
}
// LINT: This 'vm:pragma-inline' annotation has no effect. Try removing it.
('vm:prefer-inline')
void methodWithTry() {
try {
// ...
} catch (_) {
print('error');
}
}
}
✅ Good:
class SomeClass {
('vm:prefer-inline')
Future<String> good() {
return Future.value('hello');
}
Future<void> asyncMethod() async {
await good();
}
void methodWithTry() {
try {
// ...
} catch (_) {
print('error');
}
}
}
For more details and additional usage examples, take a look at the official Dart documentation on scheduleMicrotask.
compute
When building Flutter apps, for handling CPU-intensive tasks without blocking the main UI thread, one of the simplest ways to offload such tasks is the compute function, which spins up a background isolate (on native platforms) to perform the work in parallel.
First, let's see how to use it. Suppose you need to check whether a given integer is prime—a process that can be slow for large numbers. Normally, doing this calculation on the main isolate might cause jank (dropped frames).
import 'package:flutter/foundation.dart';

Future<bool> isPrime(int value) {
  return compute(_calculateIsPrime, value);
}

bool _calculateIsPrime(int value) {
  if (value <= 1) return false;
  for (int i = 2; i < value; i++) {
    if (value % i == 0) {
      return false;
    }
  }
  return true;
}

void main() async {
  final number = 1000003;
  final result = await isPrime(number);

  print('$number is prime? $result');
}
_calculateIsPrimeis a top-level (or static) function. It must not capture local state (like aBuildContext) because the isolate can only receive/send certain data types.isPrimecallscompute, passing the function_calculateIsPrimeand the integer as arguments.- On native platforms, Dart spawns an isolate, runs
_calculateIsPrime(1000003)in that isolate, and returns the result back to your main code. - Meanwhile, the UI remains responsive.
Now, let's look under the hood of the compute implementation:
Future<R> compute<M, R>(
  ComputeCallback<M, R> callback,
  M message, {
  String? debugLabel,
}) {
  return isolates.compute<M, R>(callback, message, debugLabel: debugLabel);
}
Where isolates.compute essentially:
- Spawns a new isolate (or uses
Isolate.run) on native platforms. - Serializes the
message(of typeM) to send across the isolate boundary. - Invokes
callbackin the new isolate withmessage. - Deserializes the result (of type
R) and returns aFuture<R>on the main isolate.
On web, since true isolates aren’t available in the same way, compute falls back to running the callback asynchronously on the main event loop, which means you don’t get real parallelism.
Let's analyze this implementation to learn more from it and apply what we learn to next Flutter and Dart app:
-
Separate Memory. Each isolate has its own memory heap. You can’t just pass arbitrary objects (like
BuildContext) across the boundary; the data is effectively copied or transferred. -
Ease of Use vs. Performance Cost. Spawning an isolate (or even calling
compute) involves some overhead—particularly if you call it repeatedly with small tasks.computeis designed for tasks “that take longer than a few milliseconds,” according to the docs. -
debugLabelfor Profiling. You can supply adebugLabelthat names the isolate in performance traces. This is useful when analyzing timeline events in Dart DevTools. -
One-Shot Pattern.
computeis meant for one-and-done tasks. If you have continuous or repeated work, you might need to manage a custom worker isolate or other concurrency approaches.
That's where we can learn several tips to use in our next Flutter project:
-
Leverage Isolates for CPU-Heavy Tasks.
computeis ideal for large JSON parsing, prime checks, encryption, image processing, or any CPU-bound operation that could stall the main isolate.// Big JSON string? Let compute parse it so the main UI stays smooth.
Future<Map<String, dynamic>> parseLargeJson(String data) {
return compute(_parseJson, data);
}
Map<String, dynamic> _parseJson(String jsonData) {
return json.decode(jsonData) as Map<String, dynamic>;
} -
Avoid Overusing
computefor Small Tasks. Spawning an isolate has overhead. For very short tasks (2–3ms), just do them on the main isolate or considerSchedulerBinding.scheduleTask.// Possibly overkill for just reversing a small list
Future<List<int>> reverseList(List<int> numbers) =>
compute(_reverse, numbers);
List<int> _reverse(List<int> nums) => nums.reversed.toList();If the list is tiny, you likely don’t need the overhead of isolate hopping.
-
Data Must Be “Sendable”. You can’t pass open file handles, contexts, or platform channels as arguments because they don’t serialize well. Stick to strings, lists, maps, and other simple objects.
// Good: a list of typed data (e.g. image bytes) can be sent
Future<Uint8List> invertImage(Uint8List bytes) =>
    compute(_invertColors, bytes);

Uint8List _invertColors(Uint8List bytes) {
  // do heavy pixel transformations
  return bytes;
}
This approach is fine because
Uint8Listis sendable. -
No True Parallelism on Web. In Flutter for web,
computedoesn’t create a separate thread. The callback is run asynchronously on the same main thread, so you could still see jank if the task is large.// On the web, the loop below will still block the main thread.
Future<String> bigStringOp(String data) => compute(_bigLoop, data);
String _bigLoop(String input) {
// large synchronous loop
return input;
}If you rely heavily on concurrency for web, you might explore Web Workers or other advanced patterns.
-
Error Handling. If your callback throws, the returned future completes with an error. You should handle it just like any async exception.
try {
  final result = await compute(_canFail, 42);
  print('Result: $result');
} catch (e, s) {
  print('compute failed: $e');
}

int _canFail(int val) {
  if (val == 42) throw 'No 42 allowed!';
  return val + 1;
}
This ensures your app stays robust instead of crashing unexpectedly.
Just one thing, remember, though:
- Don’t overuse
computeon tiny tasks or in tight loops (isolate startup overhead can negate benefits). - On web, it won’t magically run in parallel.
- Error handling and data serialization are crucial.
Enjoying this article?
Subscribe to get our latest articles and product updates by email.
@pragma('vm:notify-debugger-on-exception') and FlutterError.reportError
When you’re debugging a Flutter or Dart application, you might run into situations where you catch exceptions for logging or reporting (e.g., sending them to a crash-reporting tool like Sentry). By default, an attached debugger sees that the exception has been caught, so it doesn’t break on that exception.
However, if you want your debugger to break even though the exception is caught, Dart provides a specialized pragma annotation for that:
('vm:notify-debugger-on-exception')
void doSomething() {
try {
methodThatMayThrow();
} catch (exception, stack) {
// ... catch and report the error ...
}
}
The annotation @pragma('vm:notify-debugger-on-exception') hints to the VM that—if a debugger is attached— it should break at the throw site, enabling you to examine variables, stack traces, and the offending state precisely when the exception occurs.
The Flutter framework provides FlutterError.reportError for capturing and handling exceptions in a structured way. Pairing it with @pragma('vm:notify-debugger-on-exception') can give you the best of both worlds:
- You still catch the error and forward the details to your error-tracking service.
- Your debugger will break at the thrown exception, letting you inspect the conditions that caused it.
A typical pattern would be:
import 'package:flutter/foundation.dart';
('vm:notify-debugger-on-exception')
void doSomething() {
try {
methodThatMayThrow();
} catch (exception, stack) {
// Let the debugger break at the throw, but also handle the error gracefully:
FlutterError.reportError(
FlutterErrorDetails(
exception: exception,
stack: stack,
library: 'example library',
context: ErrorDescription('while doing something'),
),
);
}
}
But then how this is really Helpful? Let's break it down:
- Immediate Debugger Break: You can see the error context right when it happens, not just when you read logs or aggregated crash reports later.
- Continued Error Handling: Your production code flow remains intact because you’re still catching and reporting the error in production builds (where a debugger usually isn’t attached).
- Enhanced Development Workflow: It’s similar to an “always break on exceptions” setting in some debuggers, but fine-tuned for a specific method or block of code.
Alright, let's actually go a bit deeper and learn from under the hood and how the Dart VM treats @pragma. I'll break it down to be more understandable:
-
VM Pragmas. A
pragmain Dart can influence how the VM or compiler treats the annotated method. Thevm:notify-debugger-on-exceptionkey instructs the attached debugger (in a development environment) to break as if the exception were uncaught, even though atry/catchblock is wrapping it. -
Debugger Notification. When an exception is thrown within a method carrying this pragma, the VM checks if a debugger is connected. If so, it notifies the debugger. The debugger can then pause execution, letting you inspect variables or the call stack at the point of throw.
-
Caught Exceptions. Normally, breakpoints are triggered only for uncaught exceptions, because once an exception is caught, the runtime sees that your code is “handling” it. This pragma effectively overrides that rule, enabling the debugger to break anyway.
-
FlutterError Reporting. Calling
FlutterError.reportErrorbasically passes a structured error object (FlutterErrorDetails) to the Flutter framework. By default, this triggers theFlutterError.onErrorhandler, allowing additional logging, user-friendly UI, or reporting to Sentry/Firebase Crashlytics, etc. The@pragmaannotation simply ensures your debugger sees it before the catch logic continues.
By looking at this source code and implementation, we can discover valuable insights to apply to our codebases. Here are a few ideas:
-
Helpful Debugging. You can diagnose issues faster by breaking at the exact origin of an exception, even if you’re also catching it.
('vm:notify-debugger-on-exception')
void riskyOperation() {
try {
someFunctionThatThrows();
} catch (error, stack) {
// The debugger breaks here anyway, so you can see 'error'
FlutterError.reportError(FlutterErrorDetails(
exception: error,
stack: stack,
library: 'sample library',
context: ErrorDescription('performing risky operation'),
));
}
} -
Production vs. Development. This pragma is particularly beneficial during development with a debugger attached. In production builds, it generally has no effect (no attached debugger).
// In debug mode, break on exception. In release mode, user only sees a reported error.
debugPrint('Throwing in debug mode, but no break in release mode.'); -
Selective Use. You might not want every caught exception to break, especially if you’re dealing with “expected errors.” Use it for code blocks that are truly suspicious or high-value debugging targets.
// Only annotate the methods where you suspect subtle logic bugs.
('vm:notify-debugger-on-exception')
void parseCriticalData(String data) { ... } -
Integration with Error Reporting Services. You can keep your crash reporting logic while still halting the app for a closer look. Tools like Sentry or Crashlytics stay intact because you’re not removing the catch block, just telling the debugger to break.
('vm:notify-debugger-on-exception')
void doNetworkCall() {
try {
doApiRequest();
} catch (e, st) {
// 1. App breaks in debugger if connected
// 2. Error is still reported to a remote service
FlutterError.reportError(
FlutterErrorDetails(exception: e, stack: st, context: ErrorDescription('network call')),
);
}
} -
Works Only with the Dart VM. This is a VM-specific pragma. If you’re compiling to other environments or using Dart in contexts that don’t attach to the Dart VM debugger, the annotation won’t have the same effect.
// On mobile or desktop debug sessions, you get the break-on-exception behavior.
// On web or certain other compile targets, you may not.
You can learn more about @pragma('vm:notify-debugger-on-exception'). What matters is with this subtle yet powerful trick, you can maintain robust error reporting for end users—while ensuring that, during development, you see critical exceptions as soon as they occur.
runZonedGuarded
Dart provides zones to capture asynchronous errors at a central point. The runZonedGuarded function creates a new “error zone” that intercepts uncaught errors and routes them to a handler function you define. This helps you detect and manage exceptions in a uniform way, rather than scattering try-catches everywhere.
Here’s a straightforward Flutter example that you all have been using which is illustrating how you might wrap your main() function in runZonedGuarded to catch errors from futures or timers:
import 'dart:async';

void main() {
  runZonedGuarded(() {
    // Any code that might throw or spawn async tasks:
    runApp(MyApp());

    // For demonstration, here's an async error:
    Future.delayed(Duration(seconds: 1), () {
      throw Exception('Async error in the zone!');
    });
  }, (error, stackTrace) {
    // This callback fires for any uncaught error in the zone
    print('Caught zoned error: $error');
    print('Stack trace: $stackTrace');
    // You could also send this to your error-reporting service.
  });
}

void runApp(MyApp app) {
  // Your flutter or console app logic.
  print('App started.');
}

class MyApp {
  // ...
}
Let's go directly to the implementation of this function. Here’s a simplified version of runZonedGuarded:
R? runZonedGuarded<R>(
  R body(),
  void onError(Object error, StackTrace stack), {
  Map<Object?, Object?>? zoneValues,
  ZoneSpecification? zoneSpecification,
}) {
  _Zone parentZone = Zone._current;

  // A custom error handler that calls your 'onError' callback.
  HandleUncaughtErrorHandler errorHandler = (
    Zone self,
    ZoneDelegate parent,
    Zone zone,
    Object error,
    StackTrace stackTrace,
  ) {
    try {
      parentZone.runBinary(onError, error, stackTrace);
    } catch (e, s) {
      if (identical(e, error)) {
        parent.handleUncaughtError(zone, error, stackTrace);
      } else {
        parent.handleUncaughtError(zone, e, s);
      }
    }
  };

  // If you don't provide a zoneSpecification, create one that intercepts errors.
  if (zoneSpecification == null) {
    zoneSpecification = ZoneSpecification(handleUncaughtError: errorHandler);
  } else {
    // Merge your existing zoneSpecification with the errorHandler override.
    zoneSpecification = ZoneSpecification.from(
      zoneSpecification,
      handleUncaughtError: errorHandler,
    );
  }

  // Actually run your body in a new zone with the custom error handler.
  try {
    return _runZoned<R>(body, zoneValues, zoneSpecification);
  } catch (error, stackTrace) {
    // Catch synchronous errors from body()
    onError(error, stackTrace);
  }
  return null;
}
Let's see in a quick break down how it works:
-
Zone Forking.
runZonedGuardedcalls_runZoned(body, zoneValues, zoneSpecification), which forks the current zone with any providedzoneValuesand a customhandleUncaughtErrormethod. -
Custom Error Handler. A
HandleUncaughtErrorHandleris set up so that whenever an async error occurs in this zone, we call the user-providedonError. -
Synchronous Error Handling. If
body()itself throws immediately (before returning),runZonedGuardedcatches that error, callsonError, then returnsnull(unlessonErrorrethrows). -
Error Zone Isolation. Dart’s zone architecture ensures that async errors never cross zone boundaries. If you create a Future in this zone that completes with an error, that error is only visible in the same zone’s error handlers. Code outside the zone won’t see that error (and vice versa), preventing accidental “leaks” of exceptions across zones.
What can we learn from these and how to use it in our next Flutter and Dart project. Let me explorer a few ideas:
-
Global Error Handling. Even though repetitive, still important. Wrapping your entry point (
main) or core logic inrunZonedGuardedlets you catch uncaught errors consistently.void main() {
runZonedGuarded(() => runApp(MyApp()), (err, stack) {
logToRemoteService(err, stack);
});
}Great for logging, crash reporting, or showing custom error screens in Flutter.
-
Don’t Overdo It. Not every function or callback needs its own
runZonedGuarded. If you wrap your entire app once, that might be enough. Multiple nested zones can complicate debugging.// Single top-level usage is often enough:
runZonedGuarded(() => someComplexLogic(), onError);
// vs. sprinkling runZonedGuarded all over your codebase. -
Return Type Quirks. If
body()synchronously throws and youronErrordoesn’t rethrow,runZonedGuardedreturnsnullinstead of the intended typeR.var result = runZonedGuarded(() {
throw Exception('test');
}, (error, stack) {
// handle error, do not rethrow
});
print(result); // => null -
Beware of Future Accessibility. A future that completes with an error in one zone might appear to never complete in a different zone. Each zone has its own error boundary.
final futureInZone = runZonedGuarded(() {
  return Future.error('Zone error');
}, onError);
// Accessing `futureInZone` outside might not "see" the error,
// because the error was caught in the zone. -
Interacting with
ZoneSpecification.runZonedGuardedmerges your customZoneSpecificationwith a custom error handler. This is a powerful way to intercept timers, microtasks, or other zone hooks while still capturing uncaught errors.runZonedGuarded(() {
// ...
}, onError, zoneSpecification: ZoneSpecification(
print: (self, parent, zone, line) {
// Intercept prints, if you like
parent.print(zone, 'Intercepted: $line');
},
));
Learn more about runZonedGuarded from documentation.
Timeline.startSync / Timeline.timeSync
Flutter provides nice performance profiling tools to help developers identify slow parts of their code. One such tool is the Timeline API from dart:developer, which allows manual instrumentation of code execution in the Flutter DevTools timeline.
When you look at the API, you'll find Timeline.startSync and Timeline.timeSync and you might wonder then what these can do? Let's see.
First let's start with Timeline.startSync / Timeline.finishSync and how you can use them.Here is an example:
import 'dart:developer';

void fetchData() {
  Timeline.startSync('Fetching Data');
  try {
    // Simulate a long-running operation
    for (int i = 0; i < 1000000; i++) {
      // Some heavy work
    }
  } finally {
    Timeline.finishSync();
  }
}
This manually marks the start and end of the operation.
Another API is Timeline.timeSync and let's see how you can use it:
import 'dart:developer';

void fetchData() {
  Timeline.timeSync('Fetching Data', () {
    for (int i = 0; i < 1000000; i++) {
      // Some heavy work
    }
  });
}
This automatically wraps the block inside a timeline event and is reducing boilerplate.
To understand the better usage of these, let's explore some real examples. In the example below, I am profiling a slow API request:
import 'dart:developer';
import 'package:http/http.dart' as http;

Future<void> fetchUserProfile() async {
  Timeline.timeSync('Fetching User Profile', () async {
    final response = await http.get(Uri.parse('https://jsonplaceholder.typicode.com/users/1'));
    if (response.statusCode == 200) {
      log('User profile fetched successfully');
    } else {
      log('Failed to fetch user profile');
    }
  });
}
Here Timeline.timeSync helps track API performance in DevTools timeline and allows detection of delays in network calls.
In another example, I want to do one of the typical scenarios in Flutter, profiling UI frame performance.
Sometimes, UI lag occurs due to expensive computations in the build method or animations. Let’s measure how long a widget takes to build.
import 'dart:developer';
import 'package:flutter/material.dart';
class ProfilePage extends StatelessWidget {
Widget build(BuildContext context) {
Timeline.startSync('Building ProfilePage'); // Start tracking
final widgetTree = Scaffold(
appBar: AppBar(title: Text('Profile')),
body: Column(
children: List.generate(1000, (index) => Text('Item $index')),
),
);
Timeline.finishSync(); // End tracking
return widgetTree;
}
}
Here Timeline.startSync and Timeline.finishSync identifies slow widget builds in DevTools and helps detect performance bottlenecks in UI rendering.
I think with these two examples, you have got the idea how these are useful and can be used.
In addition to the two examples above, I can also mention a few more scenarios that you might want to use these APIs.
-
Use
Timelineto Find UI Bottlenecks** If a widget takes too long to build,Timelinecan pinpoint where the slowdown occurs.Timeline.timeSync('Expensive Widget Build', () {
MyExpensiveWidget();
});Here are some good candidates:
- Large
ListVieworGridView. - Complex
CustomPainterrendering. - Repeated widget builds with
setState().
- Large
-
Use
Timelinefor Custom Performance Logging** If you need detailed performance analysis,Timelinehelps log execution time.Timeline.startSync('Database Query');
// Run a database query
Timeline.finishSync();Here are some good candidates:
- Querying SQLite or Firebase.
- Parsing large JSON responses.
- Measuring data serialization/deserialization.
-
Prefer
Timeline.timeSyncOverTimeline.startSyncfor ReadabilityTimeline.timeSyncreduces boilerplate by automatically wrapping code blocks.Timeline.timeSync('Fetching Posts', () {
fetchPosts();
});is better than
Timeline.startSync('Fetching Posts');
fetchPosts();
Timeline.finishSync(); -
Works Best in Debug/Profile Mode
Timelineevents show up only in debugging and profiling but are ignored in release mode.if (!kReleaseMode) {
Timeline.timeSync('Debug Only Log', () {
performDebugTask();
});
}
Always refer to Timeline documentation and learn more.
unawaited
When you create a Future in Dart, it’s typically best practice to await or otherwise handle that future—especially in asynchronous functions—so you don't accidentally ignore potential errors or cause your function to return prematurely. The Dart linter can even warn you about “unawaited futures.” However, there are times when you intentionally choose not to await a Future. That’s where unawaited comes in.
Important:
unawaiteddoes not prevent the future from completing or prevent any errors from happening. If the future completes with an error and no other code handles it, that error is still considered unhandled.
Let's start with a typical scenario.
Imagine you want to trigger a fire-and-forget operation—like analytics logging or a cache cleanup job. You don’t need to wait for it to finish:
import 'dart:async';

// Without unawaited, the linter would warn you about this future not being awaited.
Future<void> trackEvent(String eventName) async {
  // Simulate sending event data.
  print('Tracking event: $eventName');
  await Future.delayed(const Duration(milliseconds: 500));
  print('Event $eventName tracked.');
}

void main() async {
  // An asynchronous function that sometimes triggers side effects.
  print('Doing main work...');

  // We don't need to wait for analytics. It's purely background.
  unawaited(trackEvent('user_sign_in'));

  // Continue doing more important tasks:
  await Future.delayed(const Duration(milliseconds: 200));
  print('Main work done.');

  // The program may end before trackEvent finishes (unless something else keeps it alive).
}
We deliberately do not need the result of trackEvent. The linter now understands this is intentional. Though, if trackEvent were to throw an error and you never handle it elsewhere, you’d have an unhandled exception.
DCM offers avoid-async-call-in-sync-function where it warns when an async function is invoked in non-async blocks.
Making asynchronous calls in non-asynchronous functions is usually a sign of a bug. In general, such functions should be marked async, and such futures should likely be awaited.
If not awaiting a future is the correct behavior, consider adding unawaited(...) or .ignore() to clearly indicate the intent. Note that .ignore() will also suppress any exceptions.
❌ Bad:
Future<void> asyncValue() async => 'value';

class SomeClass {
  SomeClass() {
    // LINT: Avoid invoking async functions in non-async blocks.
    //  Try awaiting it, wrapping in 'unawaited(...)' or calling '.ignore()'.
    asyncValue();
  }

  // LINT: Avoid invoking async functions in non-async blocks.
  //  Try awaiting it, wrapping in 'unawaited(...)' or calling '.ignore()'.
  void syncFn() => asyncValue();
}
✅ Good:
Future<void> asyncValue() async => 'value';

class SomeClass {
  SomeClass() {
    unawaited(asyncValue()); // Correct, unawaited
  }

  Future<void> asyncMethod() async => asyncValue(); // Correct, async method
}
The unawaited function documentation helps you learn more.
Enjoying this article?
Subscribe to get our latest articles and product updates by email.
FutureRecord2
When working with multiple asynchronous tasks in Dart, you often need to wait for all of them to complete before proceeding. Traditionally, this was done with Future.wait(), but Dart 3 introduced a more type-safe and elegant way to handle parallel operations using record types: FutureRecord2 and its related extensions.
If I want to break down what really this does, here are a few I can recall:
- Runs multiple futures in parallel and waits for them to complete.
- Returns a record of results, keeping their original types intact.
- Handles errors gracefully:
- If all futures succeed, you get a fully populated record of values.
- If some fail, you get a
ParallelWaitError, where you can inspect which futures succeeded and which failed.
But how can you use this? Let's see an example of FutureRecord2 which simplifies parallel awaits:
Future<String> fetchText() async {
  await Future.delayed(Duration(seconds: 1));
  return "Hello, world!";
}

Future<int> fetchNumber() async {
  await Future.delayed(Duration(seconds: 1));
  return 42;
}

void main() async {
  var (text, number) = await (fetchText(), fetchNumber()).wait;
  print('$text - $number'); // Output: Hello, world! - 42
}
But how is this better than Future.wait()?
Previously, if you wanted to wait for multiple futures and maintain strong type inference, you'd use Future.wait:
var results = await Future.wait([fetchText(), fetchNumber()]);
var text = results[0] as String;
var number = results[1] as int;
The problems with Future.wait are:
- You must manually cast the results from a
List<dynamic>. - Position-based indexing makes code harder to understand at a glance.
With FutureRecord2, type inference is automatic. The variables text and number correctly infer as String and int respectively, without needing explicit casting.
Great, now let's see how it actually has been implemented under the hood.
The wait property in FutureRecord2 is essentially syntactic sugar around Future.wait, but it leverages record types for better type inference.
A simplified conceptual implementation:
extension FutureRecord2<T1, T2> on (Future<T1>, Future<T2>) {
  Future<(T1, T2)> get wait async {
    var results = await Future.wait([this.$1, this.$2]);
    return (results[0] as T1, results[1] as T2);
  }
}
This is great, so now you can see
- Each future runs in parallel, just like
Future.wait(). - Type inference is preserved, thanks to records instead of generic lists.
- Errors are encapsulated in a
ParallelWaitError, which provides structured access to failed/successful results.
If one or more futures fail, wait will throw a ParallelWaitError, which contains:
.values: A record where failed futures havenull, and successful ones have their values..errors: A record where successful futures havenull, and failed ones containAsyncError.
Let's see it in the example:
Future<String> fetchText() async {
  await Future.delayed(Duration(seconds: 1));
  return "Hello, world!";
}

Future<int> fetchNumber() async {
  await Future.delayed(Duration(seconds: 1));
  throw Exception("Failed to fetch number!");
}

void main() async {
  try {
    var (text, number) = await (fetchText(), fetchNumber()).wait;
    print('$text - $number'); // This won't run if an error occurs
  } catch (e) {
    if (e is ParallelWaitError) {
      print("Some futures failed!");
      print("Values: ${e.values}"); // ("Hello, world!", null)
      print("Errors: ${e.errors}"); // (null, AsyncError: Exception(...))
    }
  }
}
This pattern extends beyond just two futures. You can use similar extensions for more than two values:
| Extension Type | Number of Futures |
|---|---|
FutureRecord2<T1, T2> | 2 |
FutureRecord3<T1, T2, T3> | 3 |
FutureRecord4<T1, T2, T3, T4> | 4 |
| ... | ... |
Here is an example with three futures:
var (user, posts, settings) = await (fetchUser(), fetchPosts(), fetchSettings()).wait;
If you’ve been using Future.wait, you can gradually migrate to FutureRecord2.
Before (Using Future.wait)
var results = await Future.wait([fetchUser(), fetchPosts()]);
var user = results[0] as User;
var posts = results[1] as List<Post>;
After (Using FutureRecord2)
var (user, posts) = await (fetchUser(), fetchPosts()).wait;
Learn more about FutureRecord2 here.
Expando
Dart’s Expando class allows you to dynamically associate additional properties with objects without modifying their structure. This is particularly useful when dealing with immutable objects, third-party libraries, or system objects that cannot be subclassed.
A common scenario for Expando is attaching metadata to objects that cannot be subclassed. Let’s say you want to associate extra data with HTML DOM elements in Dart:
import 'dart:html';

// Define a function type
typedef CustomFunction = void Function(int foo, String bar);

// Create a top-level Expando to attach custom functions to DOM elements
Expando<CustomFunction> domFunctionExpando = Expando<CustomFunction>();

void main() {
  final myElement = DivElement();

  // Attach a function to the element using the Expando
  domFunctionExpando[myElement] = someFunc;

  // Call the function stored in the Expando
  domFunctionExpando[myElement]?.call(42, 'expandos are cool');
}

void someFunc(int foo, String bar) {
  print('Hello. $foo $bar');
}
What's happening here? Let's break it down:
- We create an
Expando<CustomFunction>, which acts like a hidden property store. - We assign a function (
someFunc) to aDivElementinstance usingExpando. - Later, we retrieve the function via the same
Expandoand invoke it dynamically. - This allows us to attach behavior to DOM elements without subclassing them.
Output:
Hello. 42 expandos are cool
The implementation of Expando is quite interesting. Let's review it together
Expando works like a weak map where keys are object references and values are stored dynamically.
class Expando<T extends Object> {
  final String? name;

  Expando([this.name]);

  // Retrieves the value associated with the object
  T? operator [](Object object) => _get(object);

  // Associates a value with an object
  void operator []=(Object object, T? value) => _set(object, value);

  T? _get(Object object) {
    // Internal lookup mechanism
  }

  void _set(Object object, T? value) {
    // Internal storage mechanism
  }
}
There are a few things that we can learn here, let me count them:
- Weak References
Expandodoes not prevent garbage collection. If an object goes out of scope, its associated data disappears.
- Only Works on Objects
- You cannot use
Expandoonint,double,String,bool,null, orRecord. - This avoids memory leaks because primitives are often reused (
42 == 42), making them unreliable as unique keys.
- You cannot use
- Named Expandos
- If you provide a name (
Expando('myExpando')), it’s used for debugging but doesn’t affect functionality.
- If you provide a name (
Now, you may ask, apart from the HTML example, where this is helpful and you can use it. I can name a few scenarios, let's dive into them:
-
Adding Extra Data to Third-Party or System Objects. Sometimes, you need to associate metadata with objects that you cannot modify or extend.
Expandoallows this.Expando<int> objectIds = Expando<int>();
final user1 = User();
final user2 = User();
objectIds[user1] = 101;
objectIds[user2] = 202;
print(objectIds[user1]); // 101
print(objectIds[user2]); // 202Here,
Userinstances don’t have anidfield, but we can attach IDs dynamically. -
Expando Values Are Auto-Cleaned (No Memory Leaks). Unlike traditional maps,
Expandodoes not keep objects alive. If an object is no longer referenced elsewhere, it is garbage collected along with its Expando value.void test() {
Expando<String> tempData = Expando<String>();
var myObject = Object();
tempData[myObject] = "Temporary Info";
print(tempData[myObject]); // "Temporary Info"
myObject = Object(); // Previous object is garbage collected
print(tempData[myObject]); // null (new object, old one was removed)
}In contrast, using a
Map<Object, String>would retain memory indefinitely, leading to potential memory leaks. -
Not Suitable for Primitives. You cannot use
Expandoonint,double,String,bool,null, orRecordvalues.Expando<String> expando = Expando<String>();
expando[42] = "Number"; // ❌ ERROR: Expandos don't work with numbers!
expando["hello"] = "String"; // ❌ ERROR: Doesn't work with strings either!This restriction exists because Dart treats identical primitive values as the same object, meaning the expando data would never be released.
-
Attaching UI-Specific Data in Flutter.
Expandocan store additional UI-related metadata without pollutingStatefulWidgetclasses.Expando<String> widgetKeys = Expando<String>();
class MyWidget extends StatefulWidget {
State<MyWidget> createState() => _MyWidgetState();
}
class _MyWidgetState extends State<MyWidget> {
void initState() {
super.initState();
widgetKeys[this] = "WidgetID_${DateTime.now().millisecondsSinceEpoch}";
}
Widget build(BuildContext context) {
return Text(widgetKeys[this] ?? "No ID");
}
}Each widget instance can now be uniquely identified without modifying the
Stateclass. -
Debugging Named Expandos. Giving an
Expandoa name makes debugging easier, but does not affect behavior.Expando<int> myExpando = Expando<int>("DebugExpando");When debugging, tools might display
"DebugExpando"as the identifier, making it easier to track.
In short, the followings are good use cases for Expando:
✅ Associating data with third-party or system objects (e.g., HtmlElement).
✅ Attaching metadata without modifying existing class definitions.
✅ Temporary caching or tracking data without causing memory leaks.
✅ Keeping state in Flutter widgets without subclassing State.
and the followings are where you should typically avoid it:
❌ You need strong persistence—Expandos don’t persist across app restarts.
❌ The object might not have a well-defined identity (e.g., using Expando on short-lived objects may not be useful).
❌ You’re working with primitive types (use a Map instead).
Learn more about Expando<T> here.
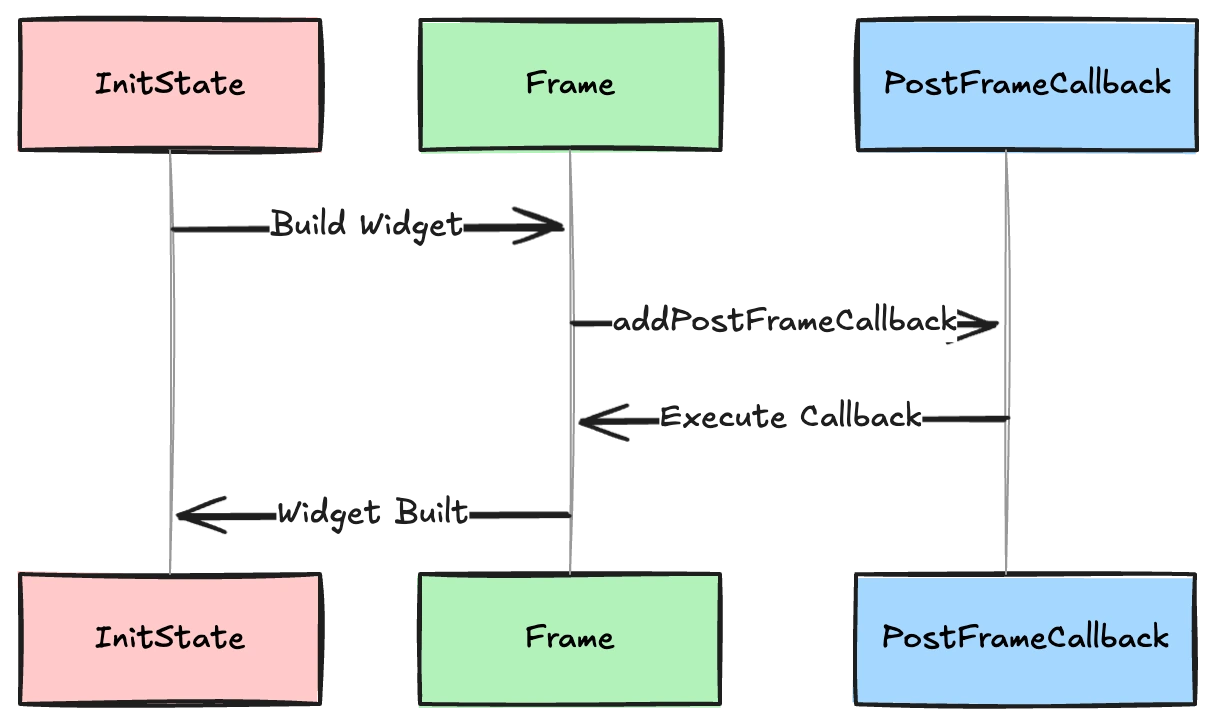
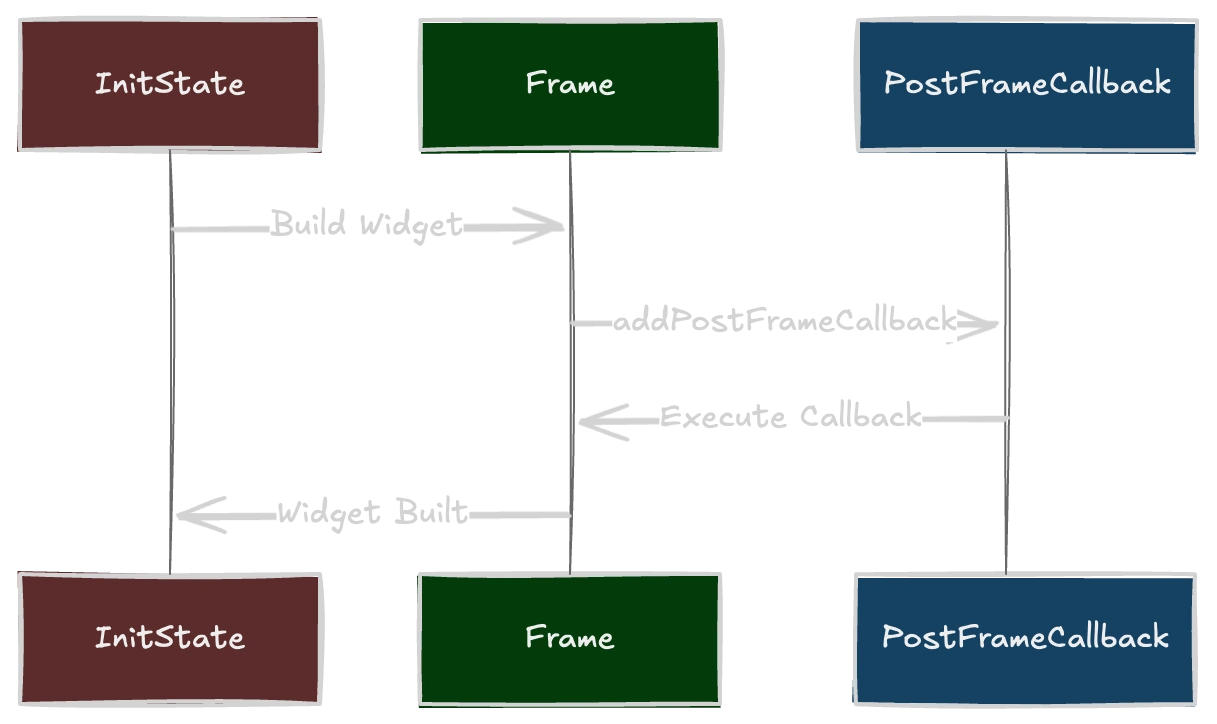
addPostFrameCallback
In Flutter, UI rendering happens in frames, and sometimes you need to execute code after a frame has been rendered. That’s where addPostFrameCallback comes in. This method schedules a callback that runs after the current frame finishes rendering but before the next frame starts.
A common use case for addPostFrameCallback is when you need to access widget properties after they have been fully built, such as getting the size of a widget.
import 'package:flutter/material.dart';
import 'package:flutter/scheduler.dart';
void main() {
runApp(MaterialApp(home: MyWidget()));
}
class MyWidget extends StatefulWidget {
State<MyWidget> createState() => _MyWidgetState();
}
class _MyWidgetState extends State<MyWidget> {
final GlobalKey _key = GlobalKey();
void initState() {
super.initState();
// Ensures the widget is fully built before accessing its size
WidgetsBinding.instance.addPostFrameCallback((_) {
final RenderBox box = _key.currentContext!.findRenderObject() as RenderBox;
final size = box.size;
print('Widget size: $size');
});
}
Widget build(BuildContext context) {
return Scaffold(
body: Center(
child: Container(
key: _key,
width: 200,
height: 100,
color: Colors.blue,
child: const Center(child: Text("Hello")),
),
),
);
}
}
Let me break it down on why addPostFrameCallback is used in the example above:
-
Widgets are not fully laid out in
initStateinitStateruns before the first frame, so callingfindRenderObject()here would result innullor incorrect dimensions.
-
Delaying Execution Until the Frame Completes
addPostFrameCallbackensures that the widget is fully laid out and its size is known before accessing it.
-
Avoiding
Future.delayedHacks- Some developers use
Future.delayed(Duration.zero, () {...})to schedule code after build, butaddPostFrameCallbackis the correct way to do this.
- Some developers use
It's always interesting to look at how this method is implemented under the hood in Flutter. Here is the source code:
void addPostFrameCallback(FrameCallback callback, {String debugLabel = 'callback'}) {
  assert(() {
    if (debugTracePostFrameCallbacks) {
      final FrameCallback originalCallback = callback;
      callback = (Duration timeStamp) {
        Timeline.startSync(debugLabel);
        try {
          originalCallback(timeStamp);
        } finally {
          Timeline.finishSync();
        }
      };
    }
    return true;
  }());
  _postFrameCallbacks.add(callback);
}
Let's break it down what is happening:
-
Post-Frame Queueing
- The callback is added to
_postFrameCallbacks, a list of functions executed after the frame completes.
- The callback is added to
-
Runs Immediately After the Frame Completes
- This happens before the next frame is scheduled.
-
Debugging and Profiling Support
- If
debugTracePostFrameCallbacksis enabled, Flutter wraps the callback in performance-tracing logic (Timeline.startSync/finishSync). - The optional
debugLabelhelps in identifying this callback in DevTools.
- If
-
One-Time Execution
- Unlike
addPersistentFrameCallback,addPostFrameCallbackruns only once per registration.
- Unlike
Let's now review a few scenarios in Flutter that you may benefit from this method. I may sound repetitive but it's important that we name the scenarios for clarity.
-
Use It to Access Widget Properties After Build Some widget properties (e.g., size, position) are not available during
initStatebut are accessible after the first frame.
void initState() {
super.initState();
WidgetsBinding.instance.addPostFrameCallback((_) {
final box = context.findRenderObject() as RenderBox;
print('Widget size: ${box.size}');
});
}This ensures that the widget is fully laid out before attempting to read its properties.
-
Avoid Running Expensive Work Inside the Callback
addPostFrameCallbackruns at the end of a frame. If it takes too long, it can delay the next frame, causing UI lag.WidgetsBinding.instance.addPostFrameCallback((_) {
for (int i = 0; i < 1000000; i++) {
// Heavy computation
}
});Instead, perform expensive work asynchronously or in an isolate.
-
Great for Triggering UI Updates After First Render Sometimes, you need to show a dialog or perform an animation after the first frame has completed.
void initState() {
super.initState();
WidgetsBinding.instance.addPostFrameCallback((_) {
showDialog(context: context, builder: (_) => AlertDialog(title: Text("Welcome!")));
});
}This avoids calling
showDialogininitState, wherecontextmight not be ready yet. -
Use It for Smooth Scrolling to a Position After Layout If you want to scroll to a specific position after the layout is built,
addPostFrameCallbackis the way to go.final ScrollController controller = ScrollController();
void initState() {
super.initState();
WidgetsBinding.instance.addPostFrameCallback((_) {
controller.jumpTo(100); // Scrolls smoothly to position 100 after build
});
}Trying to call
jumpToininitStatewould fail because theScrollControllerisn’t attached yet. -
Debugging: Use
debugLabelfor Better Insights If you have multiple post-frame callbacks, naming them helps identify potential slowdowns in DevTools.WidgetsBinding.instance.addPostFrameCallback((_) {
print('Callback executed!');
}, debugLabel: 'MyPostFrameCallback');Now, if you profile your app, you’ll see
"MyPostFrameCallback"in the timeline.
As a rule of thumb and a quick recap, I recommend you to consider addPostFrameCallback in the following use cases:
✅ When you need to access widget properties after the first frame.
✅ When triggering an action after the widget tree has been built (e.g., animations, dialogs).
✅ When scrolling to a specific position after layout is complete.
✅ When waiting for UI elements to be ready before measuring them.
and try to avoid it in the following scenarios:
❌ You need the callback to run continuously (use addPersistentFrameCallback instead).
❌ You are performing heavy computations (move them to an isolate).
❌ You are trying to force a new frame (use scheduleFrameCallback instead).
Learn more about addPostFrameCallback here.
Conclusion
In this article, we’ve explored several lesser-known yet effective Dart and Flutter functionalities. These not only enhance your app's functionality but also simplify your development process. It’s also insightful to see what’s under the hood of these functions and learn from them to apply to our Flutter and Dart applications.
This is just the beginning. Flutter and Dart are packed with hidden gems waiting to be uncovered. Stay tuned for the next article, which I will reveal in the next 10 unknown or less-used widgets in Flutter.
Remember to subscribe to our newsletter, YouTube, or social media to get the latest updates.
Enjoying this article?
Subscribe to get our latest articles and product updates by email.