Navigating the Hard Parts of Testing in Flutter
Testing is critical for building quality software and particularly in Flutter apps, especially as they grow and become more complex. Even experienced developers often see tricky scenarios and corner cases in Flutter unit and widget tests. I’ve certainly hit several edge cases myself. When I asked on Linkedin many developers responded with similar experiences.
In this article, you'll find best practices, real-world examples, and ready-to-use sample code addressing common challenges, like handling date/time bugs, platform differences, testing customPainters, asynchronous operations, or tricky plugins.
Our focus is specifically on vanilla Flutter unit and widget tests, not state management libraries such as Riverpod, BLoC or integration tests. I think those deserve articles of their own, maybe for later! One of our goals is also to know how to boost your test coverage, while 100% test coverage is controversial and especially regarding quality of tests for covering everything; it's sometimes a good indication of what and where to test.
Let's get started!
Before we start, you can download all sample code and examples in a full running app under this repository Flutter Advanced/Edge Test Cases Examples.
Controlling and Testing Time
Flutter apps often rely on timers, animations, or streams. When tests depend on actual timing, they quickly become tricky and slow. Flutter’s FakeAsync utility solves this by letting you simulate time progression instantly.
Let's see a few cases especially the ones that are consider corner cases in below:
Using FakeAsync with Widget Tests
Consider a widget that gradually fills a progress bar over three seconds:
class DelayedProgressWidget extends StatefulWidget {
const DelayedProgressWidget({super.key});
_DelayedProgressWidgetState createState() => _DelayedProgressWidgetState();
}
class _DelayedProgressWidgetState extends State<DelayedProgressWidget> {
double progress = 0.0;
Timer? _timer;
void initState() {
super.initState();
_timer = Timer.periodic(const Duration(seconds: 1), (Timer timer) {
setState(() {
progress += 1 / 3;
if (progress > 1.0) {
progress = 1.0; // Cap progress at 1.0
timer.cancel();
}
});
});
}
void dispose() {
_timer?.cancel();
super.dispose();
}
Widget build(BuildContext context) {
return LinearProgressIndicator(
value: progress,
minHeight: 10.0,
backgroundColor: Colors.grey[300],
valueColor: const AlwaysStoppedAnimation<Color>(Colors.blueAccent),
);
}
}
To effectively test this widget without waiting for real-time progression, use tester.pump() instead of directly using FakeAsync. Widget tests inherently support simulated time progression through pump(). Widget tests run in a FakeAsync zone by default, managed by TestWidgetsFlutterBinding, which allows tester.pump(Duration) to simulate time progression without manual intervention.
This ensures deterministic and fast tests, avoiding the complexity of explicit FakeAsync instantiation.
import 'package:flutter_test_cases/time.dart';
import 'package:flutter_test/flutter_test.dart';
import 'package:flutter/material.dart';

void main() {
  testWidgets('progress bar completes after 3 seconds', (tester) async {
    await tester.pumpWidget(MaterialApp(home: DelayedProgressWidget()));

    // Initially, progress should be zero.
    var progressIndicator = tester.widget<LinearProgressIndicator>(
      find.byType(LinearProgressIndicator),
    );
    expect(progressIndicator.value, 0.0);

    // Simulate 1 second passing.
    await tester.pump(Duration(seconds: 1));
    progressIndicator = tester.widget(find.byType(LinearProgressIndicator));
    expect(progressIndicator.value, closeTo(1 / 3, 0.01));

    // Simulate total of 3 seconds passing.
    await tester.pump(Duration(seconds: 2));
    progressIndicator = tester.widget(find.byType(LinearProgressIndicator));
    expect(progressIndicator.value, closeTo(1.0, 0.01));
  });

  testWidgets('Handles timer cancellation edge case', (tester) async {
    await tester.pumpWidget(MaterialApp(home: DelayedProgressWidget()));
    var progressIndicator = tester.widget<LinearProgressIndicator>(
      find.byType(LinearProgressIndicator),
    );
    expect(progressIndicator.value, 0.0);

    // Simulate partial progress
    await tester.pump(Duration(seconds: 1));
    progressIndicator = tester.widget(find.byType(LinearProgressIndicator));
    expect(progressIndicator.value, closeTo(1 / 3, 0.01));

    // Simulate cancellation by disposing widget early
    await tester.pumpWidget(Container()); // Remove widget
    await tester.pump(Duration(seconds: 2)); // No further progress
    expect(find.byType(LinearProgressIndicator), findsNothing);
  });
}
The takeaways are
- For widget tests, prefer
tester.pump(duration)rather than manually creatingFakeAsync. - Each call to
tester.pump(duration)advances the widget's internal clock instantly, making tests fast and reliable.
For further examples, explore Flutter’s official tests, such as flutter/packages/flutter/test/widgets/animated_builder_test.dart, which demonstrates time simulation in widget tests.
Handling Infinite Timers with FakeAsync
In widget tests, infinite timers can cause pumpAndSettle() to timeout, as it waits for all frames to settle.
For such cases, consider using tester.pump(Duration) with a fixed duration or, in unit tests, leverage fake.flushTimers() as shown below but before that make sure you install fake_async package.
dev_dependencies:
  fake_async: ^1.3.3 # Use the latest version
  flutter_test:
    sdk: flutter
Use fake.flushTimers() within unit tests to immediately trigger pending timers, avoiding indefinite waits.
import 'dart:async';
import 'package:fake_async/fake_async.dart';
import 'package:flutter_test/flutter_test.dart';

void main() {
  test('Handles infinite timers gracefully', () {
    fakeAsync((fake) {
      var counter = 0;
      final timer = Timer.periodic(Duration(seconds: 1), (_) => counter++);

      fake.elapse(Duration(seconds: 10));

      expect(counter, 10);

      timer.cancel(); // 👈 Cancel to prevent infinite future scheduling
      fake.flushTimers();
      // No pending timers left to cause issues.
    });
  });

  test('Captures exception from periodic timer callback', () {
    fakeAsync((fake) {
      var counter = 0;
      Object? caughtError;

      final timer = Timer.periodic(Duration(seconds: 1), (_) {
        counter++;
        if (counter == 5) {
          try {
            throw Exception('Timer error');
          } catch (e) {
            caughtError = e;
          }
        }
      });

      // The exception from the timer is caught by the test's Zone.
      // Elapsing the time will cause the exception to be thrown.
      fake.elapse(Duration(seconds: 10));

      expect(counter, 10);
      expect(caughtError, isA<Exception>());
      timer.cancel(); // cancel and then clean up
      fake.flushTimers(); // Clean up
    });
  });
}
Keep in mind that it's good to always use fake.flushTimers() to handle potentially infinite or repeated timers in your tests.
Time-dependent logic often involves microtasks or streams, which can introduce flakiness if not handled properly. Below are two critical cases to ensure robust coverage.
Microtask Scheduling
Microtasks (e.g., via scheduleMicrotask) execute immediately after the current frame, potentially causing race conditions in tests. Use fake.flushMicrotasks() to ensure all microtasks complete before assertions.
import 'dart:async';
import 'package:fake_async/fake_async.dart';
import 'package:flutter_test/flutter_test.dart';

void main() {
  test('Handles microtask scheduling', () {
    fakeAsync((fake) {
      var executed = false;
      scheduleMicrotask(() => executed = true);

      expect(executed, isFalse);
      fake.flushMicrotasks();
      expect(executed, isTrue);
    });
  });
}
Stream-based Timers
Streams with periodic emissions (e.g., for real-time updates) require testing with expectLater to verify emissions over time. This ensures coverage of stream initialization and error paths.
import 'dart:async';
import 'package:fake_async/fake_async.dart';
import 'package:flutter_test/flutter_test.dart';

void main() {
  test('Handles stream emissions', () {
    fakeAsync((fake) {
      final controller = StreamController<int>();
      final timer = Timer.periodic(
        Duration(seconds: 1),
        (_) => controller.add(1),
      );

      final emissions = <int>[];
      controller.stream.listen(emissions.add);

      fake.elapse(Duration(seconds: 3));
      expect(emissions, [1, 1, 1]);

      timer.cancel(); // 👈 Important
      controller.close(); // 👈 Clean up
      fake.flushTimers();
    });
  });
}
I also encourage always to check the Exception path.
  test('Handles stream error with await', () async {
    final controller = StreamController<int>();

    final timer = Timer(Duration(milliseconds: 10), () {
      controller.addError(Exception('Stream error'));
    });

    await expectLater(controller.stream.first, throwsA(isA<Exception>()));

    await controller.close();
    timer.cancel();
  });

  test('Handles stream error (no async)', () {
    fakeAsync((fake) {
      final controller = StreamController<int>();
      Object? caughtError;

      // Schedule a periodic timer that adds an error to the stream
      final timer = Timer.periodic(Duration(seconds: 1), (_) {
        controller.addError(Exception('Stream error'));
      });

      // Attach a listener to capture the error explicitly via onError.
      controller.stream.listen((_) {}, onError: (error) => caughtError = error);

      // Advance fake time by 1 second so the timer fires once
      fake.elapse(Duration(seconds: 1));

      expect(caughtError, isA<Exception>());

      controller.close();
      timer.cancel();
      fake.flushTimers();
    });
  });
Great, all tests so far are passed:
~/.../flutter_test_cases  > flutter test
00:01 +9: All tests passed!
Here is a summary in a quick table:
| Method | Use Case | Coverage Benefit |
|---|---|---|
pump(Duration) | Widget timer/animation | Tests frame-based branches |
flushTimers() | Unit test infinite timers | Covers repeated executions |
flushMicrotasks() | Immediate async tasks | Ensures microtask coverage |
Handling Dates, Leap Years, and Timezones
Date-dependent logic is a common source of bugs, especially when dealing with edge cases like leap years, timezones, and Daylight Saving Time (DST). Tests can pass on your local machine but fail on a CI server due to different system settings.
The solution is to control the clock and standardize your tests. The clock package allows you to fix the "current" time, while the timezone package helps handle complex DST scenarios accurately.
First, add the dependencies:
dev_dependencies:
  clock: ^1.1.1
  timezone: ^0.9.2
  flutter_test:
    sdk: flutter
you can always use withClock(Clock.fixed(...)) to set a predictable time for your tests. This helps to mock the clock. Also, standardize on UTC and write tests using DateTime.utc() to prevent issues caused by local timezones. Timezone package can help for that.
Finally, test the edges and explicitly cover leap years, non-leap years, and DST transitions to ensure full branch coverage.
Here is a comprehensive example demonstrating these practices:
import 'package:clock/clock.dart';
import 'package:flutter_test/flutter_test.dart';
import 'package:timezone/data/latest.dart' as tz;
import 'package:timezone/timezone.dart' as tz;

void main() {
  // This must be called once before using the timezone package.
  tz.initializeTimeZones();
  final newYork = tz.getLocation('America/New_York');

  group('Date logic with a controlled clock', () {
    test('Correctly handles the end of February on a LEAP year', () {
      withClock(Clock.fixed(DateTime.utc(2024, 2, 28)), () {
        final tomorrow = clock.now().add(const Duration(days: 1));
        expect(tomorrow, DateTime.utc(2024, 2, 29));
      });
    });

    test('Correctly handles the end of February on a NON-LEAP year', () {
      withClock(Clock.fixed(DateTime.utc(2023, 2, 28)), () {
        final tomorrow = clock.now().add(const Duration(days: 1));
        expect(tomorrow, DateTime.utc(2023, 3, 1));
      });
    });

    test('Ensures consistent time regardless of system timezone', () {
      withClock(Clock.fixed(DateTime.utc(2025, 7, 28, 10, 30)), () {
        expect(clock.now().hour, 10);
        expect(clock.now().isUtc, isTrue);
      });
    });

    test('Correctly handles a Daylight Saving Time forward jump', () {
      // In America/New_York on March 10, 2024, the clock jumps
      // from 1:59:59 AM to 3:00:00 AM.
      final beforeDST = tz.TZDateTime(newYork, 2024, 3, 10, 1, 59);

      withClock(Clock.fixed(beforeDST), () {
        final afterDST = clock.now().add(const Duration(minutes: 1));
        // Convert the resulting UTC time back to the local timezone
        // to observe the jump.
        final localAfterDST = tz.TZDateTime.from(afterDST, newYork);

        expect(localAfterDST.hour, 3);
        expect(localAfterDST.minute, 0);
      });
    });
  });
}
Hopefully, with these examples you are equipped to write corner cases testing to increase the code coverage.
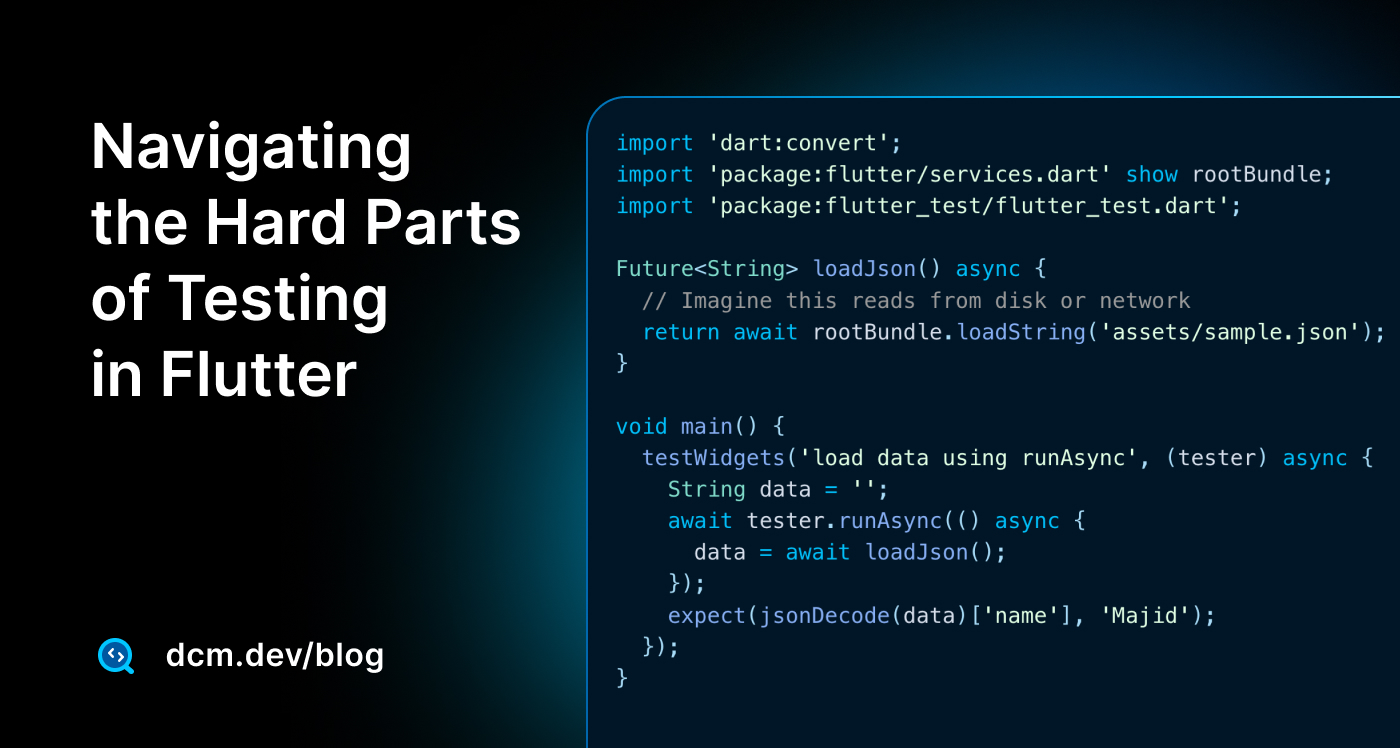
Using runAsync() for non‑UI asynchronous work
Sometimes, a widget test needs to perform a genuine asynchronous action (like reading a file or waiting for an isolate) before continuing with time-based simulation.
testWidgets runs in a fake async zone, which can cause real async code to hang. The tester.runAsync() method provides an escape hatch. This is allowing a function to execute in a real async zone before returning to the test's fake time.
Imagine your widget needs to load some JSON data from an asset file and then start an animation based on that data.
import 'dart:convert';
import 'package:flutter/services.dart' show rootBundle;
import 'package:flutter_test/flutter_test.dart';

Future<String> loadJson() async {
  // Imagine this reads from disk or network
  return await rootBundle.loadString('assets/sample.json');
}

void main() {
  testWidgets('load data using runAsync', (tester) async {
    String data = '';
    await tester.runAsync(() async {
      data = await loadJson();
    });
    expect(jsonDecode(data)['name'], 'Majid');
  });
}
Running the test flutter test
~/.../flutter_test_cases  > flutter test
00:02 +14: All tests passed!
As the documentation notes, asynchronous work that uses isolates or OS threads must be run through runAsync() to avoid deadlocks.
Mastering pump() vs. pumpAndSettle()
pump() and pumpAndSettle() are fundamental for controlling widget tests, but they serve different purposes.
tester.pump(Duration): Advances the clock by a single frame. Use it when you need fine-grained control to test intermediate states of an animation.tester.pumpAndSettle(): Repeatedly callspump()until there are no more scheduled frames. It's perfect for waiting for finite animations or navigation transitions to complete.
A common mistake is assuming pumpAndSettle() waits for any asynchronous operation, like an HTTP request. It only waits for the Flutter rendering pipeline to be idle. As shown in issues on GitHub, calling real APIs will cause pumpAndSettle() to time out.
Let's test a widget that animates its opacity over one second to see these methods in action.
First, the widget:
class FadeInWidget extends StatefulWidget {
final Widget child;
const FadeInWidget({super.key, required this.child});
State<FadeInWidget> createState() => _FadeInWidgetState();
}
class _FadeInWidgetState extends State<FadeInWidget> with SingleTickerProviderStateMixin {
late final AnimationController _controller;
void initState() {
super.initState();
_controller = AnimationController(
vsync: this,
duration: const Duration(seconds: 1),
)..forward();
}
// Best Practice: Always dispose of controllers.
void dispose() {
_controller.dispose();
super.dispose();
}
Widget build(BuildContext context) {
return FadeTransition(opacity: _controller, child: widget.child);
}
}
Then, the test:
import 'package:flutter/material.dart';
import 'package:flutter_test/flutter_test.dart';
import 'package:flutter_test_cases/fade.dart';

void main() {
  testWidgets('widget fades in correctly over its duration', (tester) async {
    await tester.pumpWidget(MaterialApp(
      home: FadeInWidget(child: const Text('hello')),
    ));

    // After half the duration, opacity should be around 0.5.
    // Use pump() to check an intermediate state.
    await tester.pump(const Duration(milliseconds: 500));
    var fadeTransition = tester.widget<FadeTransition>(find.byType(FadeTransition));
    expect(fadeTransition.opacity.value, closeTo(0.5, 0.01));

    // Use pumpAndSettle() to complete the animation.
    await tester.pumpAndSettle();
    fadeTransition = tester.widget<FadeTransition>(find.byType(FadeTransition));
    expect(fadeTransition.opacity.value, 1.0);
  });
}
In short, keep in mind:
- Use
tester.pump(Duration)to step through animations frame-by-frame. - Use
tester.pumpAndSettle()to let finite animations or transitions finish completely. - Never rely on
pumpAndSettle()for network requests. If an animation loops forever,pumpAndSettle()will time out; in that case, you must usepump(Duration).
DCM is a code quality tool that helps your team move faster by reducing the time spent on code reviews, finding tricky bugs, identifying complex code, and unifying code style.
Dependency Injection and Mocking HTTP Clients
Making real network calls in unit or widget tests leads to slow, tricky, and non-deterministic tests. Flutter docs recommend injecting a client into your functions and using a MockClient from the mockito package.
dependencies:
  http: ^1.4.0

dev_dependencies:
  mockito: ^5.5.0
First, let's define our simple data model and the service class. Notice how AlbumService takes an http.Client in its constructor, this is the key to dependency injection.
import 'dart:convert';
import 'package:http/http.dart' as http;

class Album {
  final String title;
  const Album({required this.title});

  factory Album.fromJson(Map<String, dynamic> json) {
    return Album(title: json['title']);
  }
}

class AlbumService {
  final http.Client client;

  AlbumService(this.client);

  Future<Album> fetchAlbum() async {
    final response = await client.get(Uri.parse('https://example.com/albums/1'));
    if (response.statusCode == 200) {
      return Album.fromJson(jsonDecode(response.body));
    } else {
      throw Exception('Failed to load album');
    }
  }
}
Now, we can write a test for AlbumService. We'll inject a MockClient that simulates network responses instead of the real http.Client.
import 'package:flutter_test_cases/album.dart';
import 'package:flutter_test/flutter_test.dart';
import 'package:http/http.dart' as http;
import 'package:mockito/annotations.dart';
import 'package:mockito/mockito.dart';
// 1. Add this import to include the generated file
import 'album_test.mocks.dart';
// 2. Generate a MockClient using the @GenerateMocks annotation.
([http.Client])
void main() {
// Use a group to organize tests for the same class
group('AlbumService', () {
test(
'returns an Album when the http call completes successfully',
() async {
// 3. Create the MockClient
final client = MockClient();
final service = AlbumService(client);
// 4. Stub the get() call to return a successful response.
when(client.get(Uri.parse('https://example.com/albums/1'))).thenAnswer(
(_) async => http.Response('{"id": 1, "title": "Mock Album"}', 200),
);
// 5. Assert that the service returns a valid Album
expect(await service.fetchAlbum(), isA<Album>());
},
);
test('throws an exception on a server error', () {
final client = MockClient();
final service = AlbumService(client);
// Stub the get() call to return an error response.
when(
client.get(Uri.parse('https://example.com/albums/1')),
).thenAnswer((_) async => http.Response('Not Found', 404));
// Assert that the service throws an exception.
expect(service.fetchAlbum(), throwsException);
});
});
}
To generate the required album_test.mocks.dart file, run the build_runner command:
dart run build_runner build --delete-conflicting-outputs
Now run the test flutter test
~/.../flutter_test_cases  > flutter test
00:03 +17: All tests passed!
By injecting dependencies like this, your tests become fast, reliable, and completely independent of network conditions.
Testing Plugins and Platform Channels
Flutter plugins like geolocator or connectivity_plus use platform channels to call native APIs. These channels don't exist in unit or widget tests, causing any direct plugin calls to fail.
The known and most stable solution is to wrap the plugin in your own class and use dependency injection. This isolates the platform-specific code from your application logic, allowing you to easily mock the wrapper in tests.
Let's use connectivity_plus as an example.
First, create an abstract class that defines the contract for your service. Then, create a concrete implementation that uses the plugin.
import 'package:connectivity_plus/connectivity_plus.dart';
// The abstract contract
abstract class ConnectivityService {
Future<List<ConnectivityResult>> checkConnectivity();
}
// The real implementation using the plugin
class AppConnectivityService implements ConnectivityService {
final Connectivity _connectivity;
AppConnectivityService(this._connectivity);
Future<List<ConnectivityResult>> checkConnectivity() =>
_connectivity.checkConnectivity();
}
Your UI should depend on the abstract ConnectivityService, not the concrete plugin. Here, a FutureBuilder uses the service to display a status banner.
import 'package:flutter/material.dart';
import 'package:connectivity_plus/connectivity_plus.dart';
import 'connectivity_service.dart';
class ConnectivityBanner extends StatelessWidget {
final ConnectivityService connectivityService;
const ConnectivityBanner({super.key, required this.connectivityService});
Widget build(BuildContext context) {
return FutureBuilder<List<ConnectivityResult>>(
future: connectivityService.checkConnectivity(),
builder: (context, snapshot) {
if (!snapshot.hasData || snapshot.data!.isEmpty) {
return const SizedBox.shrink(); // Show nothing while loading or if empty
}
// Check if the list contains 'none'.
final isConnected = !snapshot.data!.contains(ConnectivityResult.none);
return Material(
child: AnimatedContainer(
duration: const Duration(milliseconds: 300),
color: isConnected ? Colors.green : Colors.red,
child: Center(
child: Text(
isConnected ? 'Online' : 'Offline',
style: const TextStyle(color: Colors.white),
),
),
),
);
},
);
}
}
In your test, you can now provide a mock implementation of ConnectivityService to simulate any network state you want.
import 'package:flutter/material.dart';
import 'package:flutter_test/flutter_test.dart';
import 'package:flutter_test_cases/connectivity_service.dart';
import 'package:flutter_test_cases/connectivity_widget.dart';
import 'package:mockito/annotations.dart';
import 'package:mockito/mockito.dart';
import 'package:connectivity_plus/connectivity_plus.dart';
import 'connectivity_widget_test.mocks.dart';
([ConnectivityService])
void main() {
testWidgets('shows Offline banner when connection is none', (tester) async {
// ARRANGE: Create the mock and stub it to return a list containing .none
final mockService = MockConnectivityService();
when(
mockService.checkConnectivity(),
).thenAnswer((_) async => [ConnectivityResult.none]);
// ACT: Pump the widget
await tester.pumpWidget(
MaterialApp(home: ConnectivityBanner(connectivityService: mockService)),
);
await tester.pump(); // Let the FutureBuilder resolve
// ASSERT
expect(find.text('Offline'), findsOneWidget);
});
testWidgets('shows Online banner when connection is WiFi', (tester) async {
// ARRANGE: Stub the mock to return a list containing .wifi
final mockService = MockConnectivityService();
when(
mockService.checkConnectivity(),
).thenAnswer((_) async => [ConnectivityResult.wifi]);
// ACT
await tester.pumpWidget(
MaterialApp(home: ConnectivityBanner(connectivityService: mockService)),
);
await tester.pump();
// ASSERT
expect(find.text('Online'), findsOneWidget);
});
}
Generate the *.mocks.dart file:
dart run build_runner build --delete-conflicting-outputs
running tests and the result will be:
~/.../flutter_test_cases  > flutter test
00:03 +19: All tests passed!
This wrapper pattern is highly effective. Let me repeat again as this is important.
It keeps your app logic clean and testable, avoiding direct dependencies on platform-specific code. While you can mock MethodChannel directly using TestDefaultBinaryMessenger, that approach is generally discouraged as it couples your tests to the plugin’s internal implementation details, making them hard but liable to break.
Handling BuildContext in Unit Tests
Flutter's BuildContext is essential for accessing inherited services like Theme.of(context), MediaQuery.of(context), or Localizations.of(context). But when non-widget classes require context, testing them becomes problematic, because BuildContext can’t be instantiated directly in unit tests.
Here is an example of ThemeHelper:
class ThemeHelper {
  // This class requires a BuildContext to access theme data.
  Color getPrimaryColor(BuildContext context) {
    return Theme.of(context).colorScheme.primary;
  }
}
We can probably solve this with two solutions.
First, by providing a real Context via testWidgets. This is the most direct approach when you cannot or do not wish to refactor the class under test. It effectively turns a conceptual unit test into a small-scale widget test.
  group('ThemeHelper (uses BuildContext)', () {
    testWidgets('returns primary color from Theme.of(context)', (tester) async {
      final themeHelper = ThemeHelper();
      late BuildContext context;
      const testPrimaryColor = Colors.teal;

      await tester.pumpWidget(
        MaterialApp(
          theme: ThemeData(
            colorScheme: const ColorScheme.light().copyWith(
              primary: testPrimaryColor,
            ),
          ),
          home: Builder(
            builder: (ctx) {
              context = ctx;
              return const SizedBox.shrink();
            },
          ),
        ),
      );

      final result = themeHelper.getPrimaryColor(context);
      expect(result, testPrimaryColor);
    });
  });
While the testWidgets approach works, it's slower and has more overhead than a pure Dart test.
A more advanced and scalable solution is to refactor the dependency on BuildContext out of the class. This adheres to the "Dependency Inversion Principle" which makes your logic more portable and easier to test in isolation.
Instead of passing the entire BuildContext, pass only the specific data your class needs.
So let's start by refactoring ThemeHelper
// The refactored class has no dependency on Flutter's context.
// It depends only on the data model (ThemeData).
class RefactoredThemeHelper {
  Color getPrimaryColor(ThemeData theme) {
    return theme.colorScheme.primary;
  }
}
Now you can test your widget like:
  // A pure Dart test—no async, no WidgetTester. It's faster.
  group('RefactoredThemeHelper (pure Dart)', () {
    test('returns custom primary color from ThemeData', () {
      final helper = RefactoredThemeHelper();
      const customColor = Colors.deepOrange;
      final theme = ThemeData(
        colorScheme: const ColorScheme.light().copyWith(primary: customColor),
      );

      final result = helper.getPrimaryColor(theme);
      expect(result, customColor);
    });

    test('returns transparent for transparent primary color', () {
      final helper = RefactoredThemeHelper();
      final theme = ThemeData(
        colorScheme: const ColorScheme.light(primary: Colors.transparent),
      );

      final result = helper.getPrimaryColor(theme);
      expect(result, Colors.transparent);
    });

    test(
      'returns correct color for default ThemeData (Material 3 default)',
      () {
        final helper = RefactoredThemeHelper();
        final theme = ThemeData(); // Default ThemeData

        final expectedColor = theme.colorScheme.primary;
        final result = helper.getPrimaryColor(theme);

        expect(result, expectedColor);
      },
    );
  });
The second approach is much better and is also recommended in Flutter as your services are not dependant on Context that is Flutter related and makes your services more portable to be used in pure Dart projects too.
Understanding TestWidgetsFlutterBinding
The TestWidgetsFlutterBinding is the foundational layer that connects the Flutter engine to the test framework, giving you control over features like frame scheduling and timers.
For most unit and widget tests, you don't need to do anything. The testWidgets function automatically initializes the correct binding for a headless test environment (AutomatedTestWidgetsFlutterBinding).
However, you must call TestWidgetsFlutterBinding.ensureInitialized() manually at the top of your main() function for advanced cases where you need binding features outside the standard testWidgets setup. A key example is using runAsync to control time with FakeAsync.
import 'package:flutter_test/flutter_test.dart';

void main() {
  // Manual initialization is required to use binding features like runAsync.
  TestWidgetsFlutterBinding.ensureInitialized();

  testWidgets('Future.delayed completes after time is advanced in FakeAsync', (
    tester,
  ) async {
    // runAsync gives access to a FakeAsync zone to control time.
    tester.runAsync(() async {
      bool futureCompleted = false;
      Future.delayed(const Duration(seconds: 5)).then((_) {
        futureCompleted = true;
      });

      // Advance the test clock by 5 seconds.
      await tester.binding.delayed(const Duration(seconds: 5));

      expect(futureCompleted, isTrue);
    });
  });
}
For on-device testing, the standard is the integration_test package. It automatically uses the LiveTestWidgetsFlutterBinding, which renders frames on a physical device or emulator, allowing you to test your app in a more realistic environment.
While the integration_test runner handles setup, you can customize the framePolicy for debugging. This controls how frames are drawn during the test.
LiveTestWidgetsFlutterBindingFramePolicy.fullyLive: Renders frames continuously, making the test run like a real-time video. This is great for observing animations but be aware that it can cause tests to fail if they rely on the timing assumptions of a headless environment.LiveTestWidgetsFlutterBindingFramePolicy.onlyPumps: The default behavior, where a new frame is drawn only when your test code explicitly callstester.pump().
You can conditionally set the policy by checking the binding type:
TestWidgetsFlutterBinding binding = TestWidgetsFlutterBinding.ensureInitialized();
if (binding is LiveTestWidgetsFlutterBinding) {
  binding.framePolicy = LiveTestWidgetsFlutterBindingFramePolicy.onlyPumps;
}
Here is an example of setting the fullyLive policy in an integration test main() function:
import 'package:flutter_test/flutter_test.dart';
import 'package:integration_test/integration_test.dart';

void main() {
  final binding = IntegrationTestWidgetsFlutterBinding.ensureInitialized();

  // Set the frame policy to see the test run live on the device.
  binding.framePolicy = LiveTestWidgetsFlutterBindingFramePolicy.fullyLive;

  testWidgets('My app scrolls and finds a widget', (tester) async {
    // ... your test code
  });
}
We have in our roadmap to write about Integration Test & Golden Test in Flutter soon. Stay tuned by subscribing in our newsletter.
Enjoying this article?
Subscribe to get our latest articles and product updates by email.
Testing Navigation Flows
Testing navigation in Flutter involves verifying that user actions correctly trigger route changes. There are many application that still use the initial navigator in Flutter, let's talk about it.
There are two primary strategies for this:
- verifying the final UI state
- mocking the Navigator to verify the call itself.
Let's take this example:
import 'package:flutter/material.dart';
class MyHomePage extends StatelessWidget {
const MyHomePage({super.key});
Widget build(BuildContext context) {
return Scaffold(
body: Center(
child: ElevatedButton(
key: const Key('item_to_tap'),
onPressed: () {
Navigator.of(
context,
).push(MaterialPageRoute(builder: (_) => const SecondPage()));
},
child: const Text('Go'),
),
),
);
}
}
class SecondPage extends StatelessWidget {
const SecondPage({super.key});
Widget build(BuildContext context) =>
const Scaffold(body: Text('Second Page'));
}
"Verifying the UI State After Navigation" approach is best for widget or integration tests where you want to confirm that the entire navigation flow works and the correct widgets appear on screen. You treat the Navigator as a real component and check the result of its work.
import 'package:flutter/material.dart';
import 'package:flutter_test/flutter_test.dart';
import 'package:flutter_test_cases/navigation.dart';

void main() {
  testWidgets('navigates to detail page on tap', (tester) async {
    // ARRANGE: Build the initial page.
    await tester.pumpWidget(const MaterialApp(home: MyHomePage()));
    expect(find.byType(SecondPage), findsNothing);

    // ACT: Tap the list item and wait for the navigation animation to settle.
    await tester.tap(find.byKey(const Key('item_to_tap')));
    await tester.pumpAndSettle();

    // ASSERT: Verify the new page has appeared.
    expect(find.byType(SecondPage), findsOneWidget);
  });
}
"Verifying Navigation Calls with a Mock Observer" approach is better for more isolated unit-style widget tests. Instead of checking the UI, you verify that the Navigator.push() method was called with the correct arguments. This is faster and doesn't depend on the destination page rendering correctly.
import 'package:flutter/material.dart';
import 'package:flutter_test/flutter_test.dart';
import 'package:flutter_test_cases/navigation.dart';
import 'package:mockito/mockito.dart';
import 'package:mockito/annotations.dart';
import 'navigator_observer_test.mocks.dart';
// 1. Annotate the test file to generate a mock for NavigatorObserver.
([MockSpec<NavigatorObserver>()])
void main() {
testWidgets('navigation call is verified by mock observer', (tester) async {
// ARRANGE: Create the mock and build the app with the mock observer.
final mockObserver = MockNavigatorObserver();
await tester.pumpWidget(
MaterialApp(
home: const MyHomePage(),
navigatorObservers: [mockObserver], // Provide the mock here
),
);
// Clear any navigation from initial build
reset(mockObserver);
// ACT: Tap the item that triggers the navigation.
await tester.tap(find.byKey(const Key('item_to_tap')));
await tester
.pumpAndSettle(); // pump() is enough to trigger the method call.
// ASSERT: Verify that didPush was called on our mock observer.
// The `any` matcher from Mockito means we don't care about the arguments,
// only that the method was called.
verify(mockObserver.didPush(any, any)).called(1);
});
}
Make sure you run dart run build_runner build --delete-conflicting-outputs to generate the mock test files. Then run the flutter test command:
~/.../flutter_test_cases  > flutter test
00:05 +26: All tests passed!
In another article, we will write more about navigator 2 and navigation libraries like GoRouter in the future.
Testing Error States and Asynchronous Exceptions
A robust application must gracefully handle unexpected failures, like network errors or invalid data. Your test suite should confirm that your UI correctly displays an error state when these failures occur.
The primary strategy is to simulate error conditions by creating fake or mock implementations of your services (e.g., repositories, API clients) that are hard-coded to throw an exception. We have seen earlier in this article for mocking httpClient too.
You then provide this fake service to your widget and assert that the correct error UI is displayed.
Let's take this example
// 1. A fake repository designed to always fail.
class FakeRepository {
Future<String> fetchData() async => throw Exception('Network error');
}
// The widget under test that depends on the repository.
class MyErrorWidget extends StatelessWidget {
final FakeRepository repo;
const MyErrorWidget({super.key, required this.repo});
Widget build(BuildContext context) {
return FutureBuilder<String>(
future: repo.fetchData(),
builder: (context, snapshot) {
// It correctly displays a Text widget when the future has an error.
if (snapshot.hasError) {
return const Text('Oops', key: Key('error_message'));
}
// Otherwise, it shows nothing.
return const SizedBox.shrink();
},
);
}
}
Let's test an ErrorWidget that uses a FutureBuilder to listen for data. We will provide it with a FakeRepository that always fails.
import 'package:flutter/material.dart';
import 'package:flutter_test/flutter_test.dart';

void main() {
  testWidgets('shows an error message when the repository throws an exception',
      (tester) async {
    // ARRANGE: Pump the widget with the fake repository.
    await tester.pumpWidget(
      MaterialApp(home: MyErrorWidget(repo: FakeRepository())),
    );

    // ACT: Wait for the Future to complete and the UI to update.
    await tester.pumpAndSettle();

    // ASSERT: Verify the error message is displayed.
    expect(find.byKey(const Key('error_message')), findsOneWidget);
  });
}
Run tests,
~/.../flutter_test_cases  > flutter test
00:05 +27: All tests passed!
You should see your test passes.
Testing Responsive Layouts
Widgets adapt to available space using two primary sources of information: the global screen size from MediaQuery or the immediate parent's constraints from LayoutBuilder. Your tests should verify that the correct layout is rendered for different sizes by controlling these inputs directly.
This ensures your tests are deterministic and independent of the actual window size where the tests are run.
"Testing Widgets Dependent on MediaQuery" approach is for widgets that respond to the overall screen size (e.g., showing a Drawer on mobile vs. a NavigationRail on a tablet). You can simulate different screen sizes by wrapping your widget in a MediaQuery and providing custom MediaQueryData.
import 'package:flutter/material.dart';
import 'package:flutter_test/flutter_test.dart';
import 'package:flutter_test_cases/responsive2.dart';

void main() {
  // Test for narrow screens (width < 600): Expects Drawer layout.
  testWidgets('Displays Drawer on narrow screens', (tester) async {
    // ARRANGE: Simulate a narrow screen (phone-like) within MaterialApp.
    await tester.pumpWidget(
      MaterialApp(
        home: MediaQuery(
          data: const MediaQueryData(size: Size(400, 800)), // Width < 600
          child: const ResponsiveWidget(),
        ),
      ),
    );

    // ACT: Open the drawer by tapping the default AppBar menu button.
    await tester.tap(
      find.byIcon(Icons.menu),
    ); // Assumes default AppBar menu icon
    await tester.pumpAndSettle(); // Wait for drawer animation to complete

    // ASSERT: Verify Drawer and its contents are present, and NavigationRail is absent.
    expect(find.byType(Drawer), findsOneWidget);
    expect(find.byType(ListView), findsOneWidget); // Drawer contains ListView
    expect(find.text('Item 1'), findsOneWidget); // Drawer item check
    expect(find.text('Item 2'), findsOneWidget); // Drawer item check
    expect(find.byType(NavigationRail), findsNothing);
    expect(find.text('Phone Layout'), findsOneWidget); // AppBar title check
    expect(find.text('Main Content'), findsOneWidget);
  });

  // Test for wide screens (width >= 600): Expects NavigationRail layout.
  testWidgets('Displays NavigationRail on wide screens', (tester) async {
    // ARRANGE: Simulate a wide screen (tablet-like) within MaterialApp.
    await tester.pumpWidget(
      MaterialApp(
        home: MediaQuery(
          data: const MediaQueryData(size: Size(800, 600)), // Width >= 600
          child: const ResponsiveWidget(),
        ),
      ),
    );

    // ASSERT: Verify NavigationRail is present, and Drawer is absent.
    expect(find.byType(NavigationRail), findsOneWidget);
    expect(find.byType(Drawer), findsNothing);
    expect(find.text('Tablet Layout'), findsOneWidget); // AppBar title check
    expect(find.text('Main Content'), findsOneWidget);
  });

  // Test interaction on narrow screen: Selecting an item in Drawer updates state.
  testWidgets('Updates selected index on Drawer item tap (narrow screen)', (
    tester,
  ) async {
    // ARRANGE: Narrow screen with Drawer within MaterialApp.
    await tester.pumpWidget(
      MaterialApp(
        home: MediaQuery(
          data: const MediaQueryData(size: Size(400, 800)),
          child: const ResponsiveWidget(),
        ),
      ),
    );

    // ACT: Open the Drawer and tap the second item ('Item 2').
    await tester.tap(find.byIcon(Icons.menu)); // Default AppBar menu icon
    await tester.pumpAndSettle();
    await tester.tap(find.text('Item 2'));
    await tester.pumpAndSettle();

    // ASSERT: Verify the second item is selected (selectedIndex == 1).
    expect(
      find.byWidgetPredicate(
        (widget) =>
            widget is ListTile &&
            widget.title is Text &&
            (widget.title as Text).data == 'Item 2' &&
            widget.selected == true,
      ),
      findsOneWidget,
    );
  });

  // Test interaction on wide screen: Selecting an item in NavigationRail updates state.
  testWidgets(
    'Updates selected index on NavigationRail selection (wide screen)',
    (tester) async {
      // ARRANGE: Wide screen with NavigationRail within MaterialApp.
      await tester.pumpWidget(
        MaterialApp(
          home: MediaQuery(
            data: const MediaQueryData(size: Size(800, 600)),
            child: const ResponsiveWidget(),
          ),
        ),
      );

      // ACT: Select the second destination ('Item 2').
      await tester.tap(
        find.byIcon(Icons.bookmark_border),
      ); // Icon for second item
      await tester.pumpAndSettle();

      // ASSERT: Verify the second item is selected (selectedIndex == 1).
      final navigationRail = tester.widget<NavigationRail>(
        find.byType(NavigationRail),
      );
      expect(navigationRail.selectedIndex, 1);
    },
  );

  // Edge case: Test exactly at breakpoint (width == 600) – should use wide layout.
  testWidgets('Uses NavigationRail at exact breakpoint', (tester) async {
    // ARRANGE: Exact breakpoint within MaterialApp.
    await tester.pumpWidget(
      MaterialApp(
        home: MediaQuery(
          data: const MediaQueryData(size: Size(600, 800)),
          child: const ResponsiveWidget(),
        ),
      ),
    );

    // ASSERT: Verify NavigationRail is used at the breakpoint.
    expect(find.byType(NavigationRail), findsOneWidget);
    expect(find.byType(Drawer), findsNothing);
  });
}
"Testing Widgets Dependent on LayoutBuilder" approach is for widgets that adapt to the space given by their parent. Take this example:
// A widget that uses LayoutBuilder to change its orientation.
class OrientationWidget extends StatelessWidget {
const OrientationWidget({super.key});
Widget build(BuildContext context) {
return LayoutBuilder(
builder: (context, constraints) {
if (constraints.maxWidth > 400) {
return const Row(children: []); // Wide layout
} else {
return const Column(children: []); // Narrow layout
}
},
);
}
}
You can test this by wrapping your widget in a SizedBox or Container with a specific size.
testWidgets('layout adapts to parent constraints with LayoutBuilder',
    (tester) async {
  // ARRANGE: Provide narrow constraints.
  await tester.pumpWidget(
    const Center(child: SizedBox(width: 300, child: OrientationWidget())),
  );

  // ASSERT: Verify the narrow layout is used.
  expect(find.byType(Column), findsOneWidget);
  expect(find.byType(Row), findsNothing);

  // ARRANGE: Re-pump with wide constraints.
  await tester.pumpWidget(
    const Center(child: SizedBox(width: 500, child: OrientationWidget())),
  );

  // ASSERT: Verify the wide layout is used.
  expect(find.byType(Row), findsOneWidget);
  expect(find.byType(Column), findsNothing);
});
Testing CustomPainter Logic with MockCanvas
Testing the drawing logic within a CustomPainter's paint method presents a unique challenge. You don't want to verify the exact pixels rendered (which is slow and brittle), but rather confirm that the correct sequence of drawing commands is issued to the canvas.
The canvas_test package provides the perfect solution with MockCanvas. This utility acts as a test double for dart:ui.Canvas, recording every command called on it (drawRect, drawPath, etc.).
dev_dependencies:
  canvas_test: ^0.2.0
The recorded canvas can then be used in an expect call to verify the sequence of operations, effectively turning a visual operation into a testable set of logical steps.
import 'package:flutter/material.dart';
import 'package:flutter_test/flutter_test.dart';
import 'package:canvas_test/canvas_test.dart';
// A simple painter whose drawing logic we want to test.
class MySimplePainter extends CustomPainter {
void paint(Canvas canvas, Size size) {
final paint = Paint()..color = Colors.blue;
canvas.drawRect(const Rect.fromLTWH(10, 10, 50, 50), paint);
}
bool shouldRepaint(covariant CustomPainter oldDelegate) => false;
}
void main() {
test('MySimplePainter issues the correct drawRect command', () {
// ARRANGE
final mockCanvas = MockCanvas();
final painter = MySimplePainter();
const size = Size(100, 100);
// ACT: Call the paint method with the mock canvas.
painter.paint(mockCanvas, size);
// ASSERT: Verify that the mock canvas received the expected commands.
// The second MockCanvas acts as a "matcher" that describes the expected
// sequence of drawing calls. The `paint` argument is optional.
expect(
mockCanvas,
MockCanvas()
..drawRect(const Rect.fromLTWH(10, 10, 50, 50)),
);
});
}
Run the test flutter test
~/.../flutter_test_cases  > flutter test
00:06 +34: All tests passed!
You should see your CustomPaint widget test passes.
Conclusion
Mastering the "hard parts" of testing in Flutter is about moving beyond simple assertions and adopting strategies that grant you control over the test environment.
By controlling time with pump and FakeAsync, isolating dependencies with mocks and wrappers, and writing deterministic tests for UI logic, you can build a comprehensive and reliable test suite.
These advanced techniques are the key to ensuring your application is robust, maintainable, and ready for the complexities of real-world use and more than that, it makes it highly reliable in order to refactor existing features or adding new ones.
Stay tuned for more testing articles including integration tests, golden tests and code coverage techniques in Flutter and Dart.
Happy testing!
Sharing your feedback
Do you have a feature request? Have questions or suggestions? Please reach out via email [email protected] or on our Discord server.
Enjoying this article?
Subscribe to get our latest articles and product updates by email.